
What's the Buzz? A real-time chat room with Telerik UI and SignalR

At Telerik, we receive MANY requests for features and support on our Telerik Feedback Portal. Sometimes we'll get outlandish suggestions along the lines of, "Hey, it would be great if you had a control that would make unicorns dance on screen." We can't accommodate every request, but we watch the feedback portal closely and respond to as many popular requests as possible. One request that we have heard a number of times, most recently surfacing this January, is about a chat component with our UI for ASP.NET toolset.
In this article, I'm going to walk through setting up a page with chat capabilities using several of the Telerik ASP.NET controls: Splitter, ListView, and Notifications. I'm not only going to show you how to effect the communication between clients, I'm also going to show you how to allow the chat operation to use rich HTML with the RadEditor control as well.
Layout - Responsive to the Max!
In our ASP.NET controls, we now have extensive capabilities built in to allow your web pages to size appropriately for any device that requests your content. For this chat room, I want something similar so that visitors using a tablet, phone, or a desktop device can easily interact with the chat room.
To start, I implemented a simple three pane layout using the RadSplitter and RadPane controls. That layout markup in my ASPX page looks like the following:
<telerik:RadSplitter runat="server" Width="100%" Height="100%" Orientation="Horizontal" BorderSize="0">
  <telerik:RadPane runat="server" Scrolling="None">

    <telerik:RadSplitter runat="server" Width="100%" Height="100%" Orientation="Vertical">

      <telerik:RadPane runat="server">
      <asp:Panel runat="server" ID="messages" CssClass="messagePanel" ClientIDMode="Static" Width="100%" Height="100%"></asp:Panel>
<%-- CHAT MESSAGES GO HERE --%>
      </telerik:RadPane>
      <telerik:RadSplitBar runat="server"></telerik:RadSplitBar>

      <telerik:RadPane runat="server" Width="150" MinWidth="150" MaxWidth="300" CssClass="rightPanel" >
        <%-- CURRENT CHATTERS LIST --%>
      </telerik:RadPane>

    </telerik:RadSplitter>

  </telerik:RadPane>
  <telerik:RadSplitBar runat="server"></telerik:RadSplitBar>
  <telerik:RadPane runat="server" Height="100" MinHeight="150" MaxHeight="300" Scrolling="None">
    <%-- EDITOR SO I CAN TYPE MESSAGES --%>
  </telerik:RadPane>
</telerik:RadSplitter>
Listing 1- Layout of the page with comments indicating where each element goes
The RadPanes are allocated so that the users can stretch and size the various parts of the screen appropriately. By indicating that the RadSplitter container controls have a width and height of 100%, the layout will stretch to fill the containing document elements appropriately.
The Current List of Chatters
On the right side of the screen, I've allocated a panel with a CssClass of rightPanel that will contain my current list of chatters in the room. To present this list, I'll use a RadListView control with ASP.NET ModelBinding and strong typing to load the current chatter list while this ASP.NET page is being rendered on the server. This markup is simple, and looks like the following:
<telerik:RadListView runat="server" ID="userList" Width="100%" Height="100%" ItemPlaceholderID="currentChatters"
  SelectMethod="GetChatters" ItemType="Telerik.AjaxChat.Models.User">
  <LayoutTemplate>
    <h3>Current Chatters</h3>
    <ul id="currentChatters">
      <asp:PlaceHolder runat="server" ID="currentChatters"></asp:PlaceHolder>
    </ul>
  </LayoutTemplate>
  <ItemTemplate>
    <li id="chat_<%#: Item.Name %>"><%#: Item.Name %></li>
  </ItemTemplate>
</telerik:RadListView>
Listing 2 - List of Current Chatters
This layout looks fairly simple, but there are some neat ASP.NET 4.5 features going on here. The SelectMethod attribute defines a server-side method in the code-behind of my page that will fetch a collection of Telerik.AjaxChat.Models.User objects to present in this list. The template uses ASP.NET data binding to create a standard HTML unordered list with the name of the chatter as part of the ID and text of the list-item. More on that GetChatters method in a bit, as we next look at how the text editor is formatted on screen.
Text-Entry: Get me in the Conversation!
When I think of text entry on the web, I want to coolest and most powerful capabilities at my fingertips. Standard textboxes are passé because I want to be able to mark things as bold or underlined or even italicized when I chat. Further, I want to be able to use emoticons on screen to convey exactly what I am thinking. Fortunately for us, Telerik RadEditor can do all of that and make you look really smart at the same time.
The markup for the RadEditor is initially simple:
<telerik:RadEditor runat="server" ID="editor" Width="100%" EditModes="Design"
  OnClientLoad="Editor_OnLoad" AutoResizeHeight="true">
</telerik:RadEditor>
Listing 3 - Initial Markup for the Radeditor
I want the editor in Design mode so that I can type and see what the rendered HTML looks like before I send it to my friends in the chat room. I've also added a client-side event handler using the attribute OnClientLoad so that I can trap the press of the enter button and send that information to the chat service. That JavaScript code looks like this:
function Editor_OnLoad(editor, args) {
  editor.attachEventHandler("onkeyup", function(e) {
    if (e.keyCode === 13) { // Enter key
      SendMessage(editor.get_html(true));
    }
  });
}
Listing 4 - JavaScript to handle the Enter key press of the Chat Text Editor
Once again, there's no rocket science going on here. A simple event handler attached to the onKeyUp event of the editor that detects if the enter key was released and calls a SendMessage method with the HTML currently in the editor. We'll look at the SendMessage method when we start to connect this markup to the chat service.
The default RadEditor has a TON of great editor features on it, but there are some that aren't really useful for chatting. Plus, I really want a cool emoticon feature in my editor. Fortunately, the RadEditor supports custom toolbars with custom buttons… BONUS!
I can redefine the toolbar on my RadEditor by adding the following Tools child-element to the markup:
  <Tools>
    <telerik:EditorToolGroup>
      <telerik:EditorTool Name="Bold" />
      <telerik:EditorTool Name="Italic" />
      <telerik:EditorTool Name="Underline" />
      <telerik:EditorTool Name="StrikeThrough" />
      <telerik:EditorSplitButton Name="Emoticons" Text="Emoticons set inline" ItemsPerRow="5" PopupWidth="170px" PopupHeight="117px">
        <telerik:EditorDropDownItem Name="<img src='/content/icons/1.gif' />" Value="/content/icons/1.gif" />
		<%-- MORE EMOTICON IMAGES --%>
      </telerik:EditorSplitButton>
      <telerik:EditorTool Name="AjaxSpellCheck" ShortCut="F7" />
    </telerik:EditorToolGroup>

  </Tools>
Listing 5 - Toolbar definition for the RadEditor
With this markup I now have the default Bold, Italic, Underline, and StrikeThrough toolbar buttons. I've added a custom Emoticons button with images of emoticons that are presented in a drop-down by using the EditorSplitButton and EditorDropDownItem elements. Finally, I've added the default AjaxSpellCheck button, and defined the hotkey of F7 to trigger a spell check of words in my editor.
I need to add a small block of JavaScript to handle the press of the emoticons toolbar button, and I've attached that event handler to the OnClientCommandExecuting attribute of my editor. That code to handle the emoticon toolbar button looks like this:
function Editor_OnClientCommandExecuting(editor, args) {
  var name = args.get_name(); //The command name
  var val = args.get_value(); //The tool that initiated the command

  if (name === "Emoticons" ) {
    //Set the background image to the head of the tool depending on the selected toolstrip item
    var tool = args.get_tool();
    var span = tool.get_element().getElementsByTagName("SPAN")[0];
    span.style.backgroundImage = "url(" + val + ")";

    //Paste the selected in the dropdown emoticon
    editor.pasteHtml("<img src='" + val + "'>");

    //Cancel the further execution of the command
    args.set_cancel(true);
  }
}
Listing 6 - JavaScript to Support the Emoticons Toolbar Button
That was almost too easy… There is a complete example of building custom toolbar buttons and features available on our Telerik Sample Pages.
The Chat Hub - the SignalR glue that holds this together
The server-side component that holds this together is a SignalR hub. To add a SignalR hub to your ASP.NET project, enter the standard "Add Item to Project" dialog and search for SignalR hub. When you add this item type to your project, Visual Studio is smart enough to add the appropriate Nuget packages to your project.
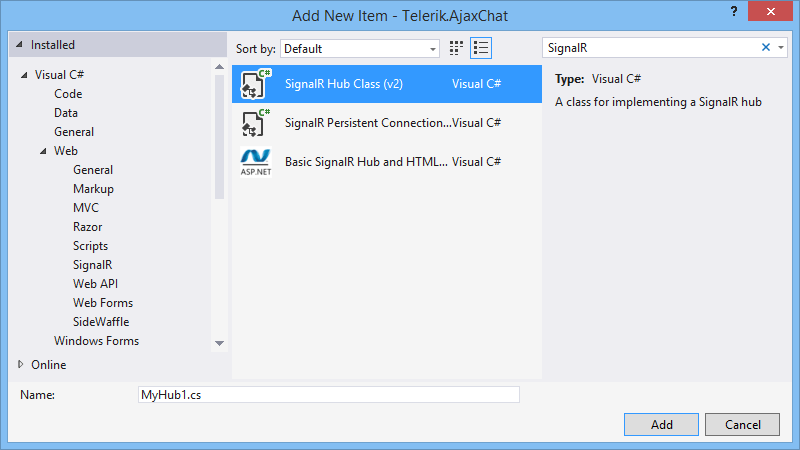
Figure 1 - Add Item - SignalR Hub
The one step you will need to do manually for your project, is map the SignalR hubs in the ASP.NET router. This is easy to do, but you need to remember that SignalR is now exclusively supported using the OWIN framework for ASP.NET. OWIN is the new Open Web Interfaces for .NET architecture that ASP.NET is embracing to allow ASP.NET frameworks to more easily interoperate. As a good citizen in this new architecture, we need to configure SignalR in the new Startup.cs class that you should find on the root of your ASP.NET application:
public partial class Startup
{
  public void Configuration(IAppBuilder app)
  {
    ConfigureAuth(app);

    // Configure SignalR
    app.MapSignalR();

  }
}
Listing 7- Startup Class Configuring SignalR
Nothing to it, the only tricky thing about it is that we need to remember that these types of startup activities are moving out of the Global.asax file and into the Startup process.
The ChatHub contains one real method for interaction with the clients: Broadcast. That method will notify all attached clients by calling the BroadcastMessage JavaScript method with the name of the user who sent the message and the HTML of their message. My code for this method looks like the following:
public void Broadcast(string msg)
{
  Clients.All.BroadcastMessage(CurrentUserName, msg);
}
Listing 8 - Syntax to Broadcast messages from the Chat Hub
That couldn't be any more straightforward, we're simply going to pass the text along to all of the clients, indicating the CurrentUserName who submitted the message and the body of the HTML message that was submitted to the service. The CurrentUserName is a property that fetches the name of the acting user from a collection of currently connected users. How do I manage that list of currently connected users? That's an easy task with the built in OnConnected and OnDisconnected methods of the base Microsoft.AspNet.SignalR.Hub class that the ChatHub descends from.
internal readonly static ConcurrentDictionary<string, string> _CurrentChatters = new ConcurrentDictionary<string, string>();

public override System.Threading.Tasks.Task OnConnected()
{
  // Get the current user with the new Identity system
  var currentUserId = Context.User.Identity.GetUserId();
  var manager = new ApplicationUserManager(new UserStore<ApplicationUser>(new ApplicationDbContext()));
  var currentUser = manager.FindById(currentUserId);

  _CurrentChatters.AddOrUpdate(Context.ConnectionId, currentUser.Name, (s,t) => s);
  Clients.All.NotifyConnection(CurrentUserName);
  return base.OnConnected();
}

public override System.Threading.Tasks.Task OnDisconnected()
{
  string outString;
  var thisUser = CurrentUserName;
  _CurrentChatters.TryRemove(Context.ConnectionId, out outString);
  Clients.All.NotifyDisconnection(thisUser);

  return base.OnDisconnected();
}
Listing 9 - Code to Manage the list of currently attached chatters
One thing I ran into was that multiple threads accessing instances of this ChatHub object would interact with the dictionary of current chatters. To allow for that interaction, I created a static ConcurrentDictionary to protect the thread access to reading and writing the current list of chatters.
I've added appropriate calls to the OnConnected and OnDisconnected methods to search the ApplicationUserManager object to find the user who is currently authenticated on the service. Detailed definitions of those objects are included in the attached source code with this article.
The final thing to note about these connected and disconnected events on the server is that when the event is finished, I notify all clients of the connection or disconnection. This will allow me to use a RadNotification to pop a 'toast' message on screen so that you know when your buddies are coming online and to manage the list of chatters on screen.
Server-Side C# Code - The Current Chatters List
Remember earlier, I indicated a SelectMethod to get the list of current chatters on my web form? Now that you've seen where I am storing that dictionary, I can write that select method to return users to the ListView:
public IEnumerable<User> GetChatters()
{
  return ChatHub._CurrentChatters.Select(k => new User {
    Name=k.Value, ConnectionId=k.Key }).ToArray();
}
Listing 10 - Select Method to return current chatters
With that final piece of server-side activity, we're ready to start activating the client-side interaction with the ChatHub service. Let's start writing some JavaScript.
Connecting the Client-Side Dots - Enabling real-time interactions with SignalR
My JavaScript to enable this chat room starts with a client-side definition of the libraries needed to use SignalR: jQuery, the jQuery-SignalR shim, and the SignalR hubs generated script from my server.
<script src="Scripts/jquery-1.10.2.min.js"></script>
<script src="Scripts/jquery.signalR-2.0.2.min.js"></script>
<script src="/signalr/hubs"></script>
Listing 11 - Script Libraries needed to run SignalR in the browser
I can then create a reference variable for the ChatHub and write a self-executing function to run at startup that will connect to the service and start listening for messages.
var chatHub;
$(function() {
  chatHub = $.connection.chatHub;
  var $msg = $("#messages");

  function init() {

  }

  $.connection.hub.start().done(init);
})();
Listing 12 - Start Connection to the SignalR Chat Hub
This code will start the connection, and it will handshake with the SignalR library using whatever protocols are available in the browser. Great, now we just need to connect that SendMessage function to send messages to the server.
function SendMessage(txt) {
  chatHub.server.broadcast(txt);

  var theEditor = $find("editor");
  theEditor.set_html("");

}
Listing 13 - Sending HTML to the ChatHub Server Broadcast method
What makes this method really interesting is that the chatHub object is generated by the server from the C# code in the ChatHub.cs file. This allows our JavaScript to see the Broadcast method that I wrote earlier in C# code, and execute it from the browser. This method ends by clearing the text from the editor once the text has been transmitted to the server.
How do the other clients receive it and have it painted on their screens? When the Broadcast method is called on the server, it relays the HTML to all clients by calling the broadcastMessage method in JavaScript. That method is defined in my JavaScript file like so:
  chatHub.client.broadcastMessage = function (user, message) {
    console.log("received message");
    $msg.append("" + user + ": " + message);
  }
Listing 14 - Client-Side Broadcast Message method
This simply receives the message and appends it to the messages panel using the jQuery append method with some formatting to indicate who sent the message.
Next, let's handle the notification of new chatters. I've added a RadNotification to the markup with syntax like the following:
<telerik:RadNotification runat="server" ID="notify"
    Position="BottomRight" Width="200"
    Animation="Fade" AnimationDuration="300" AutoCloseDelay="5000" >
</telerik:RadNotification>
Listing 15 - Markup for the RadNotification
This will allow me to push a 'toast' notification on the bottom right of the screen as chatters connect to the service. The method to listen for the connection event called from the server is called notifyConnection and has the following code:
chatHub.client.notifyConnection = function(user) {
    // Add user to list of chatters
    console.log("Connecting: " + user);
    if (!$("#chat_" + user).length) {
      $("#currentChatters").append("<li id='chat_" + user + "'>" + user + "</li>");
      $notify.set_text(user + " has joined");
      $notify.show();
    }
  }
Listing 16 - NotifyConnection JavaScript method
This method receives the name of the user connecting, looks for an element that has that user's name and adds it, if it does not exist, using another jQuery append method. Finally, the RadNotification object is configured with appropriate text to show that someone joined the room and that message is displayed. The control will automatically hide it after the five seconds defined in the RadNotification AutoCloseDelay attribute.
What do we do when a user disconnects? Simple, we remove their name from the list when the notifyDisconnection method is called.
  chatHub.client.notifyDisconnection = function(user) {
    // Remove user from list of chatters
    $("#chat_" + user).remove();
  }
Listing 17 - NotifyDisconnection Method to handle departing chatters
Results
The screen looks simple, but has a lot of power buried in it thanks to our editor and SignalR bindings:
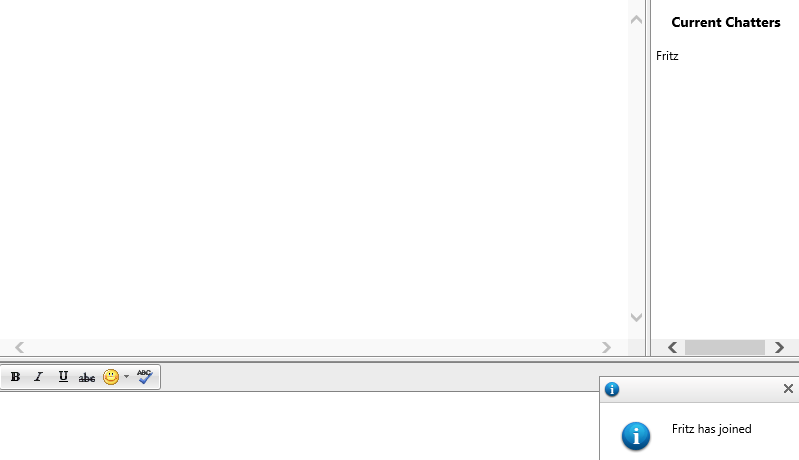
Figure 2 - Resulting Layout and Chat Screen
With just a bit of JavaScript to glue together some simple server-side resources and the power available to us in the Telerik UI controls, I was able to put this screen together in a few hours. I've made the code available with this article so that you can see exactly how this code works together.
Take it for a spin. Let me know what you think of this configuration, and see how you can extend it. This code has some limitations, so let me know how you would extend it or improve it. You can even send me a pull-request on BitBucket and we will update the sample appropriately.

Jeffrey T. Fritz
Jeffrey T. Fritz is a Microsoft MVP in ASP.Net and an ASPInsider with more than a decade of experience writing and delivering large scale multi-tenant web applications. After building applications with ASP, ASP.NET and now ASP.NET MVC, he is crazy about building web sites for all sizes on any device. You can read more from Jeffrey on his personal blog or on Twitter at @csharpfritz.
Related Posts
Comments
All articles
Topics
Latest Stories
in Your Inbox
Subscribe to be the first to get our expert-written articles and tutorials for developers!
All fields are required