
5 Steps for Learning React Application Development

Getting going with React can sometimes be overwhelming. Or, at least, this is what people are saying. The consensus seems to be that the difficulty in getting going is mostly due to the following realities or obstacles.
- The information available is not written for average developers.
- Massive updates to the JavaScript language in 2015, and the potential future updates being actively used today, have muddied the water. i.e. learning ES6 & ES* and React at the same time can involve a mountain of change when coming from ES3 and script includes.
- React is actually a rather small abstraction that typically is present as a cog in a system of many other complex moving parts. Grokking the parts and React at the same time is a complicated affair. I find that most developers agree:
Redux, react, flux, es6/7, webpack, jspm, tackle them one by one and everything should be okay, but combine all those at once and learning how to do apps with Redux suddenly becomes much harder. - Cedric Dugas from Thoughts about React, Redux & javascript in 2016
In this article, I'm going to prescribe a set of thoughtfully curated steps for learning React that I hope might bring some relief to these three difficulties.
That was the good news. The bad news is that productive learning paths, taught by someone other than you, are rarely free. Learning React from others will cost you some cash. If you follow the steps below it will cost you around $73.00 USD (or around $30.00 if you use 10 day trials). This amount will get you one month of access to several sites providing React learning materials (i.e. $29 a month for Pluralsight or 10 day free trial + $29 a month for Evented Mind + $15 a month for tutsplus.com or 10 day free trial).
Prerequisites
Let's discuss some prerequisites. Steps one and two will require that you have some HTML and JavaScript chops. These steps focus on learning React without learning how to build an actual React app.
When you reach step three you'll need a good understanding of Node, npm, ES6 (including ECMAScript modules and either Webpack, systemJS or Browserify), and Babel. If you lack a basic understanding of each of these, I would suggest you brush up on the basics before moving to step three. If you spend the money on the learning resources I mentioned above, catching up shouldn't be too difficult, given most of these resources also provide Node, npm, Webpack, SystemJS, ES6, and Babel screencasts.
Now, before you go complaining and crying fatigue realize these technologies are the minimal barrier to entry with most of the competing solutions (i.e. Angular 2, Ember, and Aurelia). If you think learning these extra parts isn't worth your time, I'd like to suggest you back up from React and have a look at vue.js, riot.js, or mithril (i.e. download one(ish) script file, include it in HTML page, and go!). After all you might not need React, or need to learn it. And the last thing you want to do is use React when something simpler will suffice.
Seeding React Ideas
I'd like to plant some broad React ideas (in no particular order) into your head before you get dizzy and overwhelmed. This might all be gibberish right now but reading them will help you connect some dots in the future.
- React components are virtual (i.e. written in JS) until they are rendered (i.e.
render()) to the virtual DOM which, in turn, updates the actual DOM with the fewest changes required. The idea is that implicit DOM interactions (i.e. jQuery DOM interactions) are avoided and given over to an abstracted DOM (i.e. the virutal DOM). - React delivers on the merits and value of web components today! (i.e. structuring your app into a tree of single purpose elements/components minus web component standards.)
- React doesn't want you to write HTML. It wants you to write JSX inside of JavaScript files. It even wants your styles to be written in JS. The React way starts with JS and ends with JS. It's JS all the way down. It doesn't have to be, but that is what is presented in the React docs.
- React doesn't use a templating engine, it uses JSX. Think of JSX as a magical, string-less type of HTML written in JavaScript requiring a compiling step. Yes, JSX is optional, but the alternative is writing painfully verbose functions. JSX is easier to read and write in a JavaScript file. Just remember that it must be transformed into JavaScript functions before running in the browser.
- The momentum behind React doesn't lie in its focus on the UI or the virtual DOM. The value of React is found in the fact that it provides the tools needed to create a tree (i.e. composition) of components where data flows in a sane manner (i.e. one-way reactive data flow). That's the secret sauce!
- A React element is equal to an HTML element. A React component can minimally be a single React/HTML element but when the term component is used, you should think of it as a grouping of React elements that make up a distinct region of your UI. For example, a login component. A login component is not one element. It is several elements that all make up one login component.
- React "Props" are likened to HTML properties. They are used to declaratively pass configuration to components and child components. Props shouldn't be mutated, that is what "state" is for.
- React "state" is the mechanism to deal with a components unique data changes over time. If you like a photo (or unlike), then that photo needs to know that you have liked it (or unliked it) and contain that state.
-
You'll be really bewildered by what looks like HTML elements sprinkled through your JavaScript files. Don't forget, these HTML/React elements get transformed into JavaScript so a browser can parse the React code.
JSX goes from this:
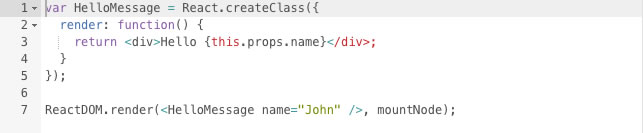
To this (note the
createElementfunction replaces JSX):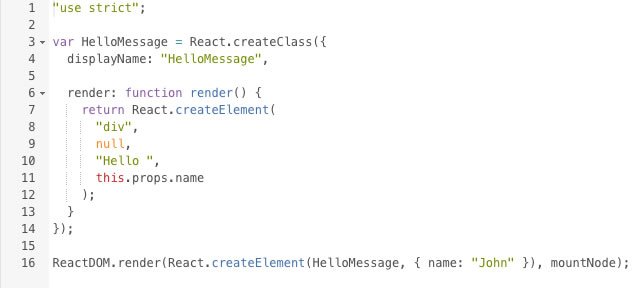
-
While it's possible to have dumb or stateless components, the focus of React is on building stateful components containing stateless child components relying on the top-most parent for state (i.e. data). Thus, React is more than the V in MVC. It is also the C in most cases. The top most component is often refereed to as a controller component because this is where the state is managed. Consider the explanation from the React docs:
A common pattern is to create several stateless components that just render data, and have a stateful component above them in the hierarchy that passes its state to its children via props. The stateful component encapsulates all of the interaction logic, while the stateless components take care of rendering data in a declarative way.
As you learn, return to these ideas to see if what I am saying becomes more meaningful.
Step 1: Understand why Facebook built React
This is the most important step that you'll be tempted to skip. Don't! Before going off and trying to understand what exactly React is, first you should strive to understand why it is.
Step 1.a - Watch: JS Apps at Facebook or Introduction to React.js
Step 1.b - Read: Why did we build React?
Step 1.c - Watch: Pete Hunt: React: Rethinking best practices
Step 2: Get the React Gist, Before Getting To The API
This step will lay the foundational mental model for React. Read this material knowing that the next step will fill in the missing details.
Step 2.a - Read (but skip if too basic): React.js Introduction For People Who Know Just Enough jQuery To Get By
Step 2.b - Read: ReactJS For Stupid People
Step 2.c - Read: The React Quick Start Guide
Step 2.e - If you are feeling brave, read: Removing User Interface Complexity, or Why React is Awesome
Step 3: Learn React Fundamentals i.e. How to Use The API
It's time to stretch those fingers and play around with some code. In this step, you should strive to gain the fundamental concepts through real code comprehension (i.e. learn to write React code and know what it is doing).
This is the step where everything will break down if you don't have knowledge about Node, npm, ES6 (including ECMAScript modules and either webpack, systemJS, or Browserify), and Babel.
Step 3.a - Read: Learn Raw React — no JSX, no Flux, no ES6, no Webpack… then consider reading part two and part three as well.
Step 3.b - Watch: Getting Started With React.
Step 3.c - Watch: React.js: Getting Started. This is a bit outdated, but worth an hour of your time. Watch and digest the concepts discussed.
Step 3.d - Watch: Understanding React. This is also a bit outdated, but worth an hour of your time. Watch and digest the concepts discussed. Then read the official React tutorial.
Step 4: Build An App
This is the step where you take all of your React knowledge and add in some additional players to make an actual application.
Step 4.a - Read: All the official mini guides starting from "Displaying Data".
Step 4.b - Watch: Building a Wiki With React and Firebase
Step 4.c - Read: Flux For Stupid People
Step 4.d - Watch: Building Applications with React and Flux
Step 4.e - Watch: Build a Microblogging App With Flux and React
Step 4.f - Watch: Building a Real-time App with React, Flux, Webpack, and Firebase
Step 5: Go Build Something
A lot of people will skip forming a foundational amount of knowledge and just start build something for the sake of learning. I personally think this is a waste of time. After all, is it more efficient to sink, then learn not to drown or, learn to swim and then go swimming. If you followed the steps above, you've learned to swim and you should be ready to go and build something.
When building you need to be aware of the following resources:
I love learning Me Some React, So Give Me More
If you are still in need of more and want to move from terse screencasts to more of a course, I have two recommendations.
React for Beginners (starting at $47)
and
Building Modern Web Apps (with React, Ampersand, ES6 and Webpack) (starting at $39 from Frontend Masters)
It's my hope that by curating these steps, and by you following them to some degree, getting going with React will be easier. Good luck.

Cody Lindley
Cody Lindley is a front-end developer working as a developer advocate for Telerik focused on the Kendo UI tools. He lives in Boise, ID with his wife and three children. You can read more about Cody on his site or follow him on Twitter at @codylindley.
Comments
All articles
Topics
Web Mobile DesktopDesktop
Design
Productivity
People
Latest Stories
in Your Inbox
Subscribe to be the first to get our expert-written articles and tutorials for developers!
All fields are required