TypeScript with Visual Studio 2015

TypeScript is being used everywhere from our own internal projects, like NativeScript and AppBuilder, to adoption by Google in Angular 2. It should come to no surprise that JavaScript is going to be hard to avoid in the future. But what exactly is TypeScript, how do I use it and what are the added benefits?
What is TypeScript?
TypeScript is a typed superset of JavaScript that compiles to plain JavaScript. It works everywhere and is open source. It offers classes, modules, interfaces and more along with powerful tooling such as static checking, refactoring and statement completion. The easiest way to learn more is to read the language specification guide or follow the official blog.
Installing TypeScript
You can run TypeScript on Windows, Linux or Mac. If you are using Windows and have updated to Visual Studio 2015, then it is ready to go without installing any additional software. If you are using Visual Studio 2013, then you will need to install this package. If you are using Mac make sure you have Node.js and NPM installed and enter the following command:
npm install -g typescriptThat is it and your system is ready to run the latest version of TypeScript. But which IDE or editor can you use? Thankfully, you have a vast variety of options besides Visual Studio such as Sublime Text, WebStorm, Visual Studio Code or even the web browser playground. There are other options, but for this tutorial we will be working with Visual Studio 2015.
The Compiler and TypeScript Definition Files
The Compiler
If you're using one of the supplied IDEs or editors mentioned earlier, then you won't have to do this step, but it is good to know.
You can compile a TypeScript file to a JavaScript file with the following command.
tsc script.tsA file called script.js will be created in the same folder that you ran tsc. If you would like to see a list of all commands currently available, then use 'tsc' as shown below:
C:\Program Files (x86)\Microsoft Visual Studio 14.0>tsc
Version 1.5.3
Syntax:   tsc [options] [file ...]

Examples: tsc hello.ts
          tsc --out file.js file.ts
          tsc @args.txt
This will give you the version number of TypeScript installed and some examples on the sytax. Take note, that by using the --out parameter as shown above you can compile multiple TypeScript files into a single file. This is the only command that I manually run since using TypeScript and one that might help you.
TypeScript Definition Files
Statement Completion (or IntelliSence in the Microsoft World) can come in very handy when writing your web app. Thankfully, TypeScript already supports this for standard syntax, but what about third-party libraries such as jQuery, Angular, Backbone and more? Wouldn't you like Statement Completion for those libraries as well? Gratefully there is a Github repository with type definitions for the most common JavaScript libraries.
How do you use them?
We are going to use the Standard jQuery library as an example. Navigate to this repo and download the jquery.d.ts file. Add it to your project along with the latest jQuery build. Open up a TypeScript file and add the following code:
/// <reference path="typings/jquery/jquery.d.ts" />

declare var $: JQueryStatic;

var onClicked = function () {
    alert("Clicked!");
}

var main = function () {
    $("#greet").click(onClicked);
}

$(document).ready(function () {
    main();
});
Add a HTML page and include the following code inside your body tag.
<body>
 <input id="greet" value="Hello!" type="button" />
</body>
In the TypeScript file, we reference our definition file first downloaded from the GitHub repo. Then we declare var $ to the JQueryStatic interface (more on this later). This will give us code completion throughout this TypeScript file. Next, we use the familiar $ syntax from JQuery to get an id on our HTML page (called greet) and add a click event handler to it. Once the page loads and we click the button, the alert appears.
In this example, we added code completion to a third-party library and used familar jQuery syntax in our TypeScript file! Let's switch to Visual Studio and start our first project.
Using TypeScript With Visual Studio 2015
Regardless of which IDE or editor you have installed, we are going to take a look at how TypeScript would benefit our development team. However, in these examples, I'm going to be using Visual Studio 2015.
Before proceeding, I'd recommend installing "Web Essentials 2015" as it will make working with web projects much easier.
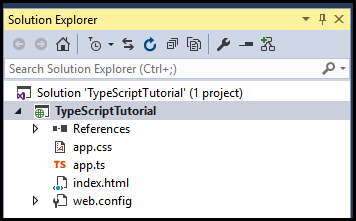
To get started, select "Other Languages" -> then "TypeScript" and finally "HTML Application with TypeScript". If we look at what Visual Studio 2015 stubbed out for us then we will see the following :
Using Visual Studio, it will automatically create a local web server, compile the .ts (TypeScript) file to JavaScript and load the index.html when you press the run button. Go ahead and run it and come back to the solution.
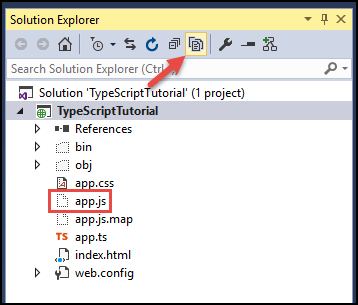
You will notice the generated JavaScript file is not showing up under the solution. Select the project and click the button that says, "Show All Files" as shown below:
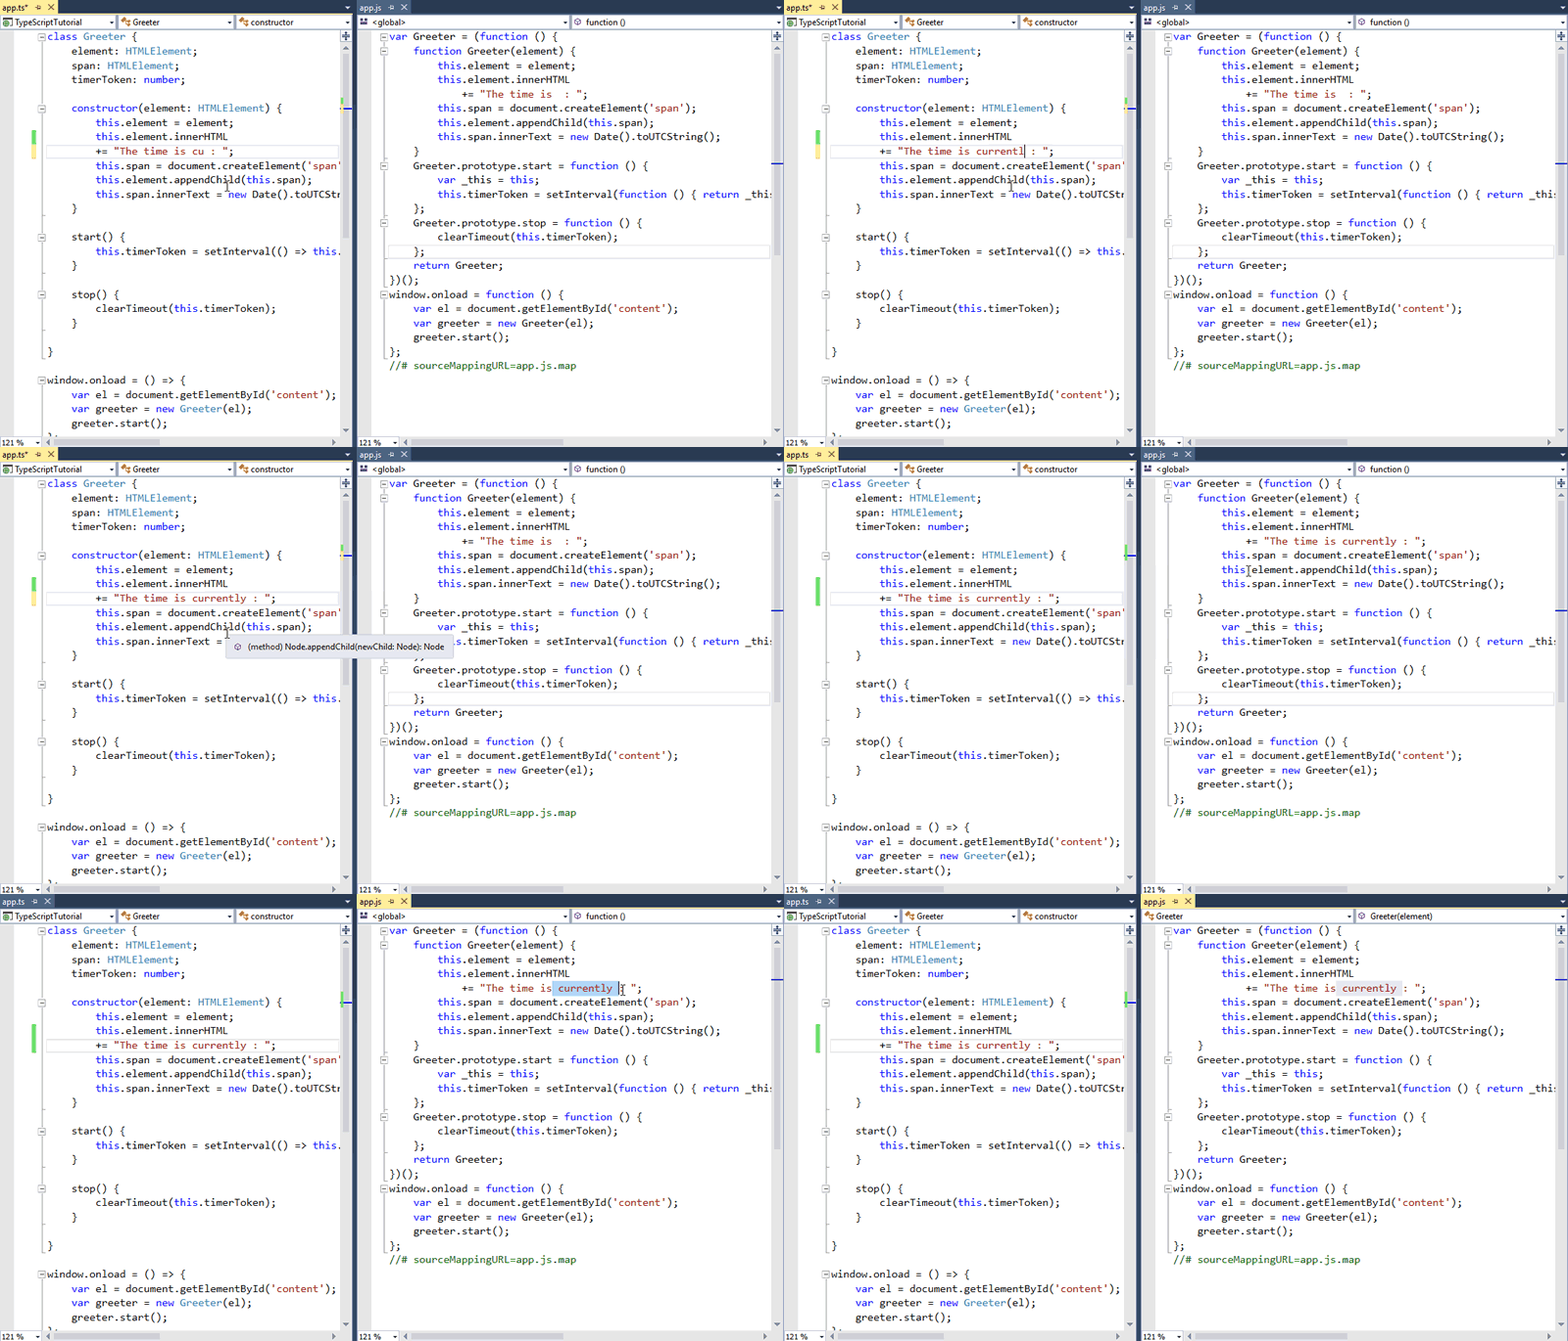
Now in order to see the generated JavaScript file alongside our TypeScript file, we are going to dock our TypeScript file to the left-hand panel and the JavaScript file to the right-hand panel. We can do this by dragging the .js file to the center of the screen and the dock will appear. After we make a change to our TypeScript file, then we can simply press CTRL-S to save it and the JavaScript file will update automatically as shown below.
We could use the --watch command as shown in the "Compiler" section to update this file automatically, but we'll keep things simple for now.
Our development environment is setup correctly, now for our favorite part - coding!
Note: Earlier versions of Web Essentials would allow the split-screen view automatically, but with the latest release this is currently the only way to get a split-screen view.
Let's Get to Work! - Syntax Basics
Before we can dig into TypeScript, let's start with some of the basics. Open your IDE or editor and type the following two lines.
var name = 'Michael Crump'; //name is using Type Inference as a string since it was declared as a string

var fullName: string = 'Michael Crump'; //fullName is using a Type Annotation and is declared as a string
By reading the comments, you can see that we are using Type Inference in the first example and Type Annotation in the second since we used the : string annotation.
The same thing can be said with numbers, booleans, arrays, etc.
var num = 1;
var bigNumber: number = 100;
But what if you declare a variable and don't set any data like the following?
var something;You will see that it is of type "Any". These are types of variables that we may not know when we are writing the application.
Later on in our application, we could change the type:
var something;
something = 'Michael Crump'; //Now it is a String
something = 100; //Now it is a Number
If we evaluate the something variable, after the code has been executed, then it will evaluate to 100.
Functions and Optional Typing
We've already been working with optional typing, so we just need to start tying it together with a function to see the full potential. If we add the following function, we can see that it is looking for a string to be passed in. It will return "Michael Crump" after the method is called.
function helloPerson(s1: string) {
    return s1; //will return Michael Crump
}

helloPerson(name);
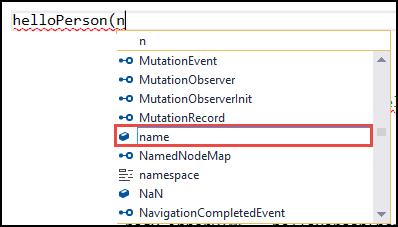
As we typing out that function, we get code completion.
Let's create another function called addNumbers and pass in the following parameters without specifying the type.
function addNumbers(num1, num2) {
    return num1 + num2;
}

addNumbers(name, something)
The result would be : "MichaelCrump100". This clearly isn't what we were looking for, as we wanted to add two numbers together.
If we revised our code sample and added the type (as shown in yellow below), then it would have caught the error in the IDE rather than concatenating a string and a number as shown earlier. Below is an example of what this looks like in the browser:
If we change "name" to a number (such as the following), then we won't see an error.
addNumbers(15, something);Interfaces
We have used an interface already in the TypeScript definition file, but let's look at how this could be beneficial with creating our own. In short, interfaces describe a type. While classes and functions deal with implementation. Interfaces help us keep our programs error-free in the IDE or editor by providing information about the shape of the data that we are going to work with.
Add the following code in your TypeScript file:
interface Book {
    title: string;
    author: string;
    bookInfo: () => string;
}

var b: Book = {
    title: 'Moby Dick',
    author: 'Herman Melville',
    bookInfo: function () {
        return this.title + " by : " + this.author;
    }
}

var book = b.bookInfo();
alert(book);
We have declared an Interface called Book and given it a title and author as well as a function. If we declare the b variable and use the Book interface, we can enter information about the title and author as well as what the function should return.
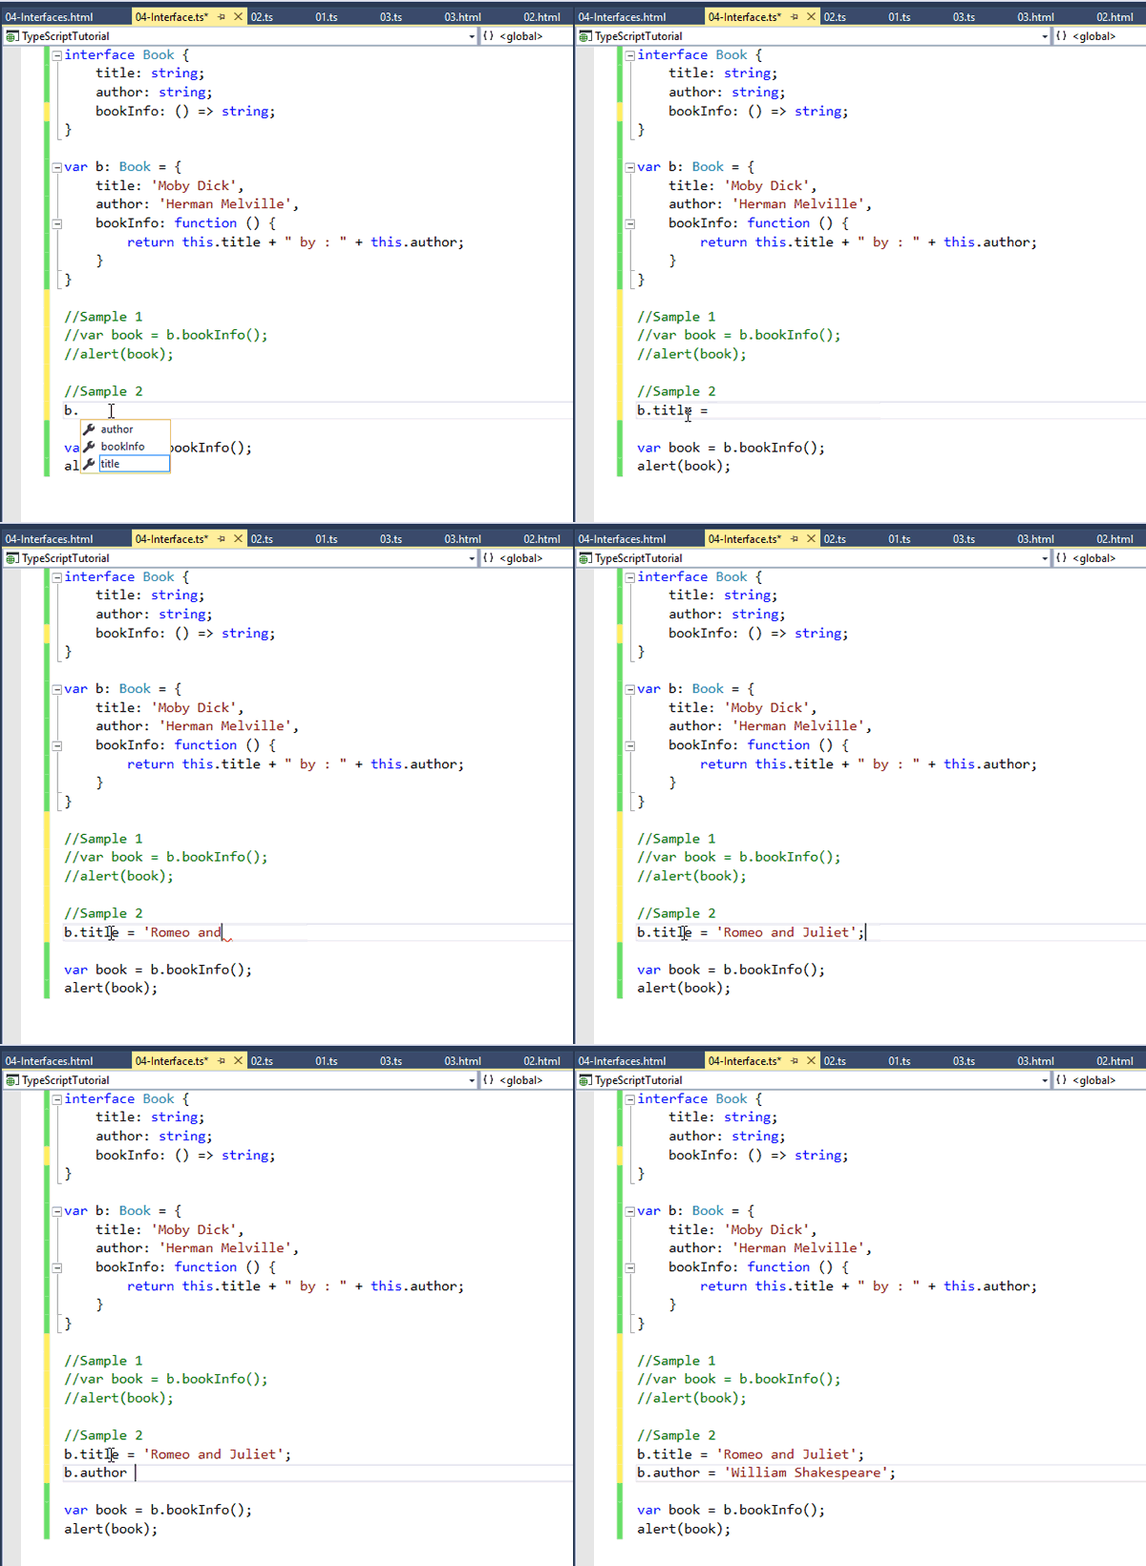
When we run the last two lines of code, we will see "Moby Dick by : Herman Melville." We could change the title and author by simply providing the following two lines of code:
b.title = 'Romeo and Juliet';
b.author = 'William Shakespeare ';
Again, we can see syntax highlighting and code completion as well as the ability to tell what type you are using. It will automatically correct errors on the fly.
Debugging
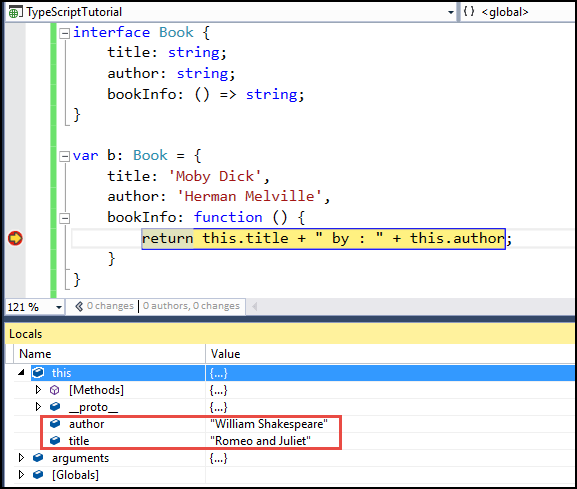
By default a mapping file is created that allows us to debug your TypeScript application. If you look in the folder where our .ts and .js reside, we will find a .map file. Let's go ahead and put a break point on the return line and we can inspect the locals window to see what the value of the properties are at run-time.
Classes
You can think of classes as containers for different members of your application. These contain fields, constructors, properties and functions. Let's extend the Interface we created before to use a class.
interface Books {
    title: string;
    author: string;
    bookInfo: () => string;
}

class MyBook implements Books {
    title = 'Moby Dick';
    author = 'Herman Melville';
    bookInfo () {
        return this.title + " by : " + this.author;
    }
}

var b: Books = new MyBook();
alert(b.bookInfo())
The interface code is identical, except now we have a container called, "MyBook" that implements Books. In the last line, we instantiate our MyBooks class that conforms to the interface we created earlier. If we run the application, the same result is displayed, but in a cleaner way.
The source code for this article can be found here
Keep Calm and Learn on!
There is so much to TypeScript that it can be overwhelming at times. I know that is how I felt as I started learning TypeScript and reading the language specification guide. Hopefully, this post is enough to get you started in the right direction without sifting through pages of documentation and looking at outdated code samples. I hope I've sparked your interest in TypeScript. So what are you waiting for? Try it out now!

Michael Crump
Michael Crump is a Microsoft MVP, Pluralsight and MSDN author as well as an international speaker. He works at Telerik with a focus on everything mobile. You can follow him on Twitter at @mbcrump or keep up with his various blogs by visiting his Telerik Blog or his Personal Blog.

