
Monkeying around with Kendo UI and Modulus

Last April, I introduced the concept of the M.I.K.E. web stack, which was hatched from a few too many cocktails at a company party with my co-workers. I wrote an article about it and introduced it at our company's conference, TelerikNEXT. M.I.K.E. stands for a web stack built using MongoDB for the database, io.js for the server, Kendo UI for the web widgets and routing, and Express.js for the web tier and managing the server-side API construction and routing.
However, since last April, a few things have changed. Most importantly, io.js has officially merged back into Node. According to the io.js web site:
There won't be any further separate io.js releases (except for critical security fixes). All of the features in io.js are available in Node.js v4 and above.
If we no longer have to worry about io.js vs. Node, it's probably a good time to revisit M.I.K.E. and spin up a new acronym, MoNKEy. Why MoNKEy, you ask? Well, instead of io.js, we're going back to using Node.js for your server tier. This way, you can use Mongodb, Node.js, Kendo UI, and Express.js, and everything will work fine!
Note, to remove io.js from the stack, simply remove its reference as the engine in package.json
Sure, we took some creative license with the acronym, but the MoNKEy stack just sounds like fun. With that said, I've created a new badge for you to stick onto your web creations:
![]()
This new configuration is so little changed from the original M.I.K.E. stack, that I'm going to refer you to the original article and slide deck to get yourself up and started with the basics of building it from scratch. With the following pointers, you can use the IDE of your choice with some code already scaffolded for you, so that you can start building right away.
Installation and Configuration
I've conveniently provided some seed code so that you can get up and running on a Node provider such as Modulus quicker than a chimpanzee. Here are the steps to get your development environment in shape for MoNKEy:
- Download and install, or update, the Modulus CLI and make sure you have git and npm installed.
- Install MongoDB locally and install a Mongo database management tool. MongoChef works particularly well with Modulus. Once installed, make sure Mongo is started on your local computer by typing
mongodon the command line. Using MongoChef, create a new database called MIKE on your local machine (we're keeping the MIKE name in a few places to reflect what is in the code and not redo everything). - Clone the seed code:
git clone https://github.com/jlooper/MIKE.git. The app code actually resides in the sample-app folder. - CD to the sample-app folder and type
npm installto install the app's dependencies. - While in the sample-app folder, type
node app.js. This will start your node instance running on localhost. - Test your new local site. The two sample routes I have built include a simple contact form with validation, and a more complex form that allows you to build a recipe and view it immediately in a list view at the top of the page, built using a Kendo template.
As you may have noticed, there are several code improvements from the original M.I.K.E. codebase that I'd like to outline below.
What's New?
More Modular Code
One of the enhancements immediately requested by those who attended the initial presentation of this work was to make it more modular. Originally, all the Kendo templates were contained in an index.html file. It proved quite easy to break up the various pages of the app into .ejs files. Simply change the location of the pages and set the view engine to be ejs so that you can break up your code into partials and pages:
app.set('views', __dirname + '/views');
app.set('view engine', 'ejs');
This allows you to scale your app by creating .ejs pages as separate Kendo templates in the /pages folder, keeping headers and JavaScript includes in the /partials folder:

To add a new page, add an .ejs template and reference it in index.ejs as an include file:
<% include ../partials/nav.ejs %>
<% include home.ejs %>
<% include contact.ejs %>
Validation
Adding validation was easy due to Kendo's helpful validator. Before the ajax form posts, make sure the data is valid:
var validator = $("#contactForm").kendoValidator().data("kendoValidator");
    if (validator.validate()) {
        //post the form
    } else {
        //show an alert
    }
Ensure that the form elements displays the correct validation messages:
<div class="col-lg-6">
   <input id="fName" required validationMessage="Enter your first name"  data-bind="value: fName"  name="fName" type="text" placeholder="First Name" class="form-control">
</div>
<div class="col-lg-4">
   <span class="k-invalid-msg" data-for="fName"></span>
</div>
CRUD features
By adding a new Kendo template, you can create a view that displays the results of the form posting below. The data will be displayed in a Kendo UI listView widget and includes the ability to delete line items. Try it out here.
$.ajax({
    url: '/api/lists',
    type: 'post',
    data: serializedDataToPost,
    contentType: 'application/json',
    success: function(result) {
$('#recipeListView').data('kendoListView').dataSource.read();
    }
})
Deploy to Modulus
When you are satisfied with your app and how it behaves locally, you're ready to deploy it to Modulus. Here are some tips on how to do this:
- Create a project on a Modulus servo:

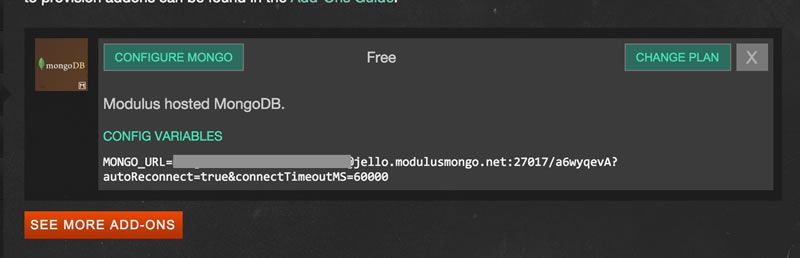
- Create an add-on Mongo database with a new user (e.g. not root) and password:
-
Create an environment variable called
MONGO_DB, add your connection string to this environment variable and save it. It will look something like this:mongodb://myNewUser:myNewPassword@apollo.modulusmongo.net:27017/guxoW9oxBeware! There's an environment variable already set up called
MONGO_URLwhich you shouldn't use for your new mongoDB connection. Instead, use a new environment variable and the database user and password that you created when you added the database to the account. -
When you're ready CD to your project root and type
modulus deploy. You will be prompted to pick your Modulus project and the site will deploy after a series of steps are passed. When your Modulus servo restarts after this deployment, it will pick up your new environment variable and connection string. You should be able to save data to your database at this point.
Enjoy!
I hope this setup might be useful to you. Let me know in the comments if you are using it, what you are building, and how you've enhanced it. Happy coding!
Header image courtesy of Ian Ransley

Jen Looper
Jen Looper is a Developer Advocate for Telerik products at Progress. She is a web and mobile developer and founder of Ladeez First Media which is a small indie mobile development studio. In her spare time, she is a dancer, teacher and multiculturalist who is always learning.
Comments
All articles
Topics
Latest Stories
in Your Inbox
Subscribe to be the first to get our expert-written articles and tutorials for developers!
All fields are required