
Building SharePoint Add-ins with Kendo UI

SharePoint provides a rich development platform to extend its capabilities. Historically, this has been accomplished through code running on the server-side through ASP.NET. With the release of SharePoint 2013, Microsoft evolved this model to allow developers to build solutions through self-contained extensions called SharePoint Add-ins.
Instead of being based on ASP.NET, add-ins are built using a combination of web technologies like HTML, CSS, and JavaScript. This change was introduced to move away from having custom managed code running on SharePoint servers, which was the source of many management problems in terms of versioning, security, and the like.
Evolving the add-in model to incorporate web technologies enables developers to use front-end libraries and tools. Kendo UI is ideally suited for this purpose. It features 70+ responsive UI components that can easily integrate with the SharePoint REST API. Additionally, it ships with built-in themes, including one that matches the Office 365 look and feel. It provides a built-in export functionality to most common office formats, like Excel, PDF and image files. And it covers widely-recognized accessibility standards like WAI-ARIA, WCAG 2.0 and Section 508. These features make Kendo UI the ideal solution for building SharePoint Add-ins.
Getting Started
This article assumes a working understanding of HTTP, SharePoint, and Kendo UI. You'll need Visual Studio and Kendo UI to replicate the steps outlined below. It's based on the sample we published on GitHub, which is a SharePoint Add-in that utilizes Kendo UI to visualize data stored in SharePoint that's integrated through its REST APIs.
Building a SharePoint Add-in with Kendo UI
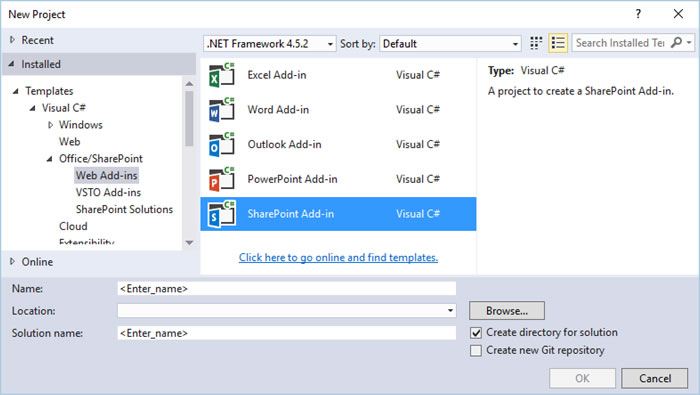
Let's begin by creating a SharePoint-hosted SharePoint Add-in with Kendo UI using Visual Studio (File → New → Project...):
The New SharePoint Add-in wizard will appear after creating the project:

It's important to specify HTTPS for the SharePoint site you'll use to debug your add-in, otherwise Visual Studio will be unable to connect to your site. In this example, I'm connecting to a SharePoint site that's been provisioned through SharePoint Online. I've also elected to create a SharePoint-hosted Add-in.
SharePoint Add-ins come in two flavors: SharePoint-hosted Add-ins and Provider-hosted Add-ins. SharePoint-hosted Add-ins are served through SharePoint websites and are built with a combination of HTML, CSS, and JavaScript. Provider-hosted Add-in utilize external resources to SharePoint and can be built using any web stack (i.e. PHP). To better understand your hosting options, read the article entitled, Choose Patterns for Developing and Hosting your SharePoint Add-in for a detailed explanation.
Clicking the next button then presents you with the following screen, asking you to specify the version of SharePoint you intend to target:
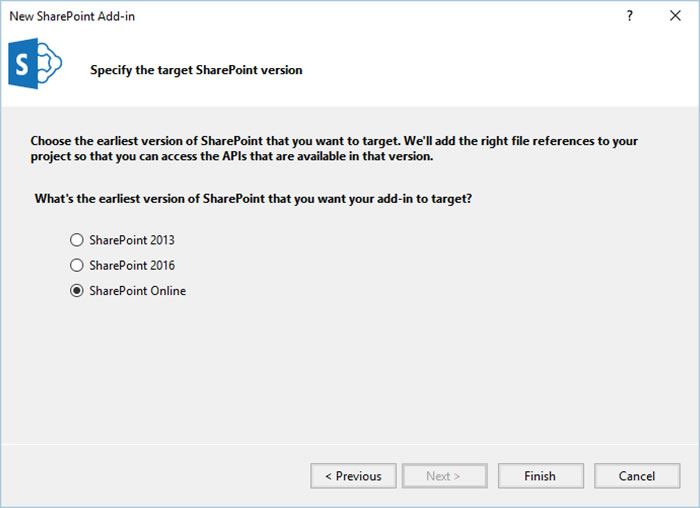
This example targets SharePoint Online so I'll specify this option to ensure that the right file references are included in my project. After clicking the finish button, the following project will be created:
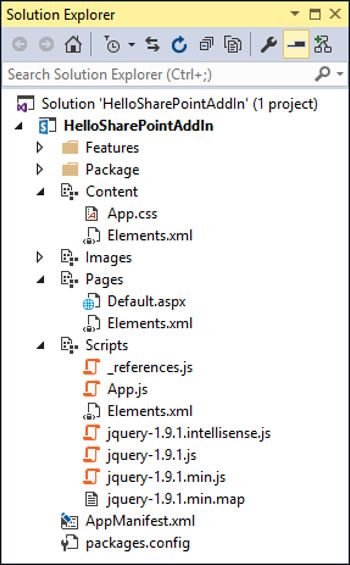
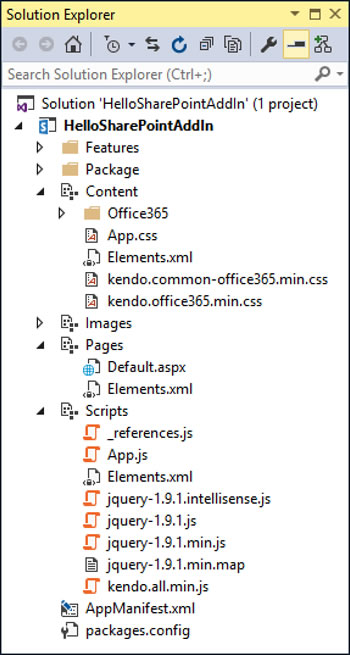
The key files and folders located in the project structure include the following:
- Content: the content module for add-in stylesheets (including third-party stylesheets);
- Content/App.css: the default stylesheet for the add-in;
- Pages/Default.aspx: the default starting page of the add-in;
- Scripts: the scripts module for add-in JavaScript resources (including third-party stylesheets);
- Scripts/App.js: the default JavaScript file underlying the default starting page;
- AppManifest.xml: the deployment package properties for your add-in.
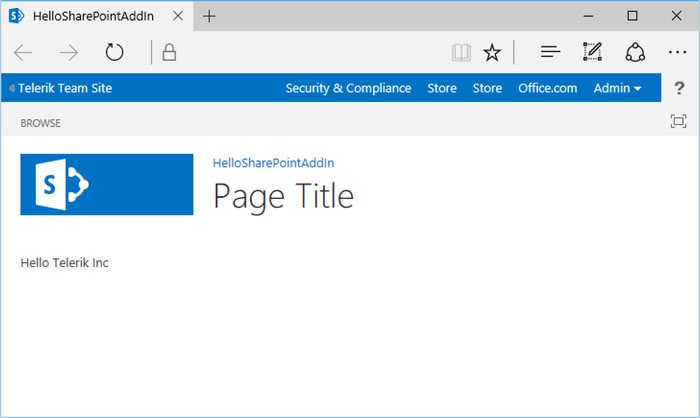
Let's see what the add-in looks like before we start to use Kendo UI. Pressing F5 (Debug → Start Debugging) will install the add-in on the target SharePoint site and launch a debugging session with the default browser:
Adding in Kendo UI
The first step towards building a SharePoint Add-in with Kendo UI is to include its stylesheet and script resources. These can be obtained through the bundles we publish or via tools like Bower, NuGet, or the custom download builder. These resources are to be placed in the Content and Scripts modules of the SharePoint Add-in:
Adding Kendo UI into a SharePoint Add-in is pretty simple. The first step is to integrate the stylesheet and script references into the default starting page (Pages/Default.aspx).
There are a few ways to do this; we provide Kendo UI via Bower, NuGet, bundles, or the custom download builder. Once integrated, I'd strongly recommend referencing these through the CDN for both jQuery and Kendo UI with a local fallback. This works by attempting to load a resource from a CDN and then performing a check in JavaScript to determine if it loaded correctly. If it does then you can move on; otherwise, you can load (fallback) to a local resource.
<link rel="stylesheet" href="https://kendo.cdn.telerik.com/2016.1.412/styles/kendo.common-office365.min.css" />
<link rel="stylesheet" href="https://kendo.cdn.telerik.com/2016.1.412/styles/kendo.office365.min.css" />

<script src="https://kendo.cdn.telerik.com/2016.1.412/js/jquery.min.js"></script>
<script>
  if (typeof jQuery == "undefined") {
    // fallback to local jQuery
    document.write(decodeURIComponent('%3Cscript src="../Scripts/jquery.min.js" %3E%3C/script%3E'));
  }
</script>

<script src="https://kendo.cdn.telerik.com/2016.1.412/js/kendo.all.min.js"></script>
<script>
  if (typeof kendo == "undefined") {
    // checking for loaded CSS files is cumbersome so let's assume that if
    // the scripts have failed, so have the stylesheets

    // fallback to local Kendo UI stylesheets
    document.write(decodeURIComponent('%3Clink rel="stylesheet" href="../Content/kendo.common-office365.min.css" %3C/%3E'));
    document.write(decodeURIComponent('%3Clink rel="stylesheet" href="../Content/kendo.office365.min.css" %3C/%3E'));

    // fallback to local Kendo UI scripts
    document.write(decodeURIComponent('%3Cscript src="../Scripts/kendo.all.min.js" %3E%3C/script%3E'));
    // also add kendo.aspnetmvc.min.js or kendo.timezones.min.js, if needed
  }
</script>
In the markup above, we first reference the CDN-based stylesheets for the Office 365 theme that ships with Kendo UI (kendo.common-office365.min.css and kendo.office365.min.css). This is one of many themes that ship with Kendo UI, which you can explore yourself through the Kendo UI ThemeBuilder:
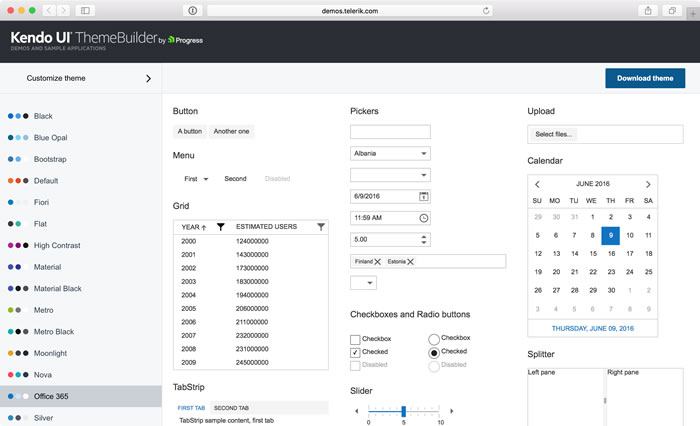
The Office 365 theme matches the default theme of SharePoint and works well with other front-end frameworks like Office UI Fabric.
Next, we reference the CDN-based script reference for jQuery and employ a fallback if the resource is unavailable:
if (typeof jQuery == "undefined") {
  // fallback to local jQuery
  document.write(decodeURIComponent('%3Cscript src="../Scripts/jquery.min.js" %3E%3C/script%3E'));
}
This is accomplished by attempting to qualify the jQuery type in the global scope. If it exists then we know that jQuery loaded successful from the CDN. If it doesn't exist than we inject a local reference (from the Scripts module) into the DOM.
We can apply this same technique for Kendo UI:
if (typeof kendo == "undefined") {
  // checking for loaded CSS files is cumbersome so let's assume that if
  // the scripts have failed, so have the stylesheets

  // fallback to local Kendo UI stylesheets
  document.write(decodeURIComponent('%3Clink rel="stylesheet" href="../Content/kendo.common-office365.min.css" %3C/%3E'));
  document.write(decodeURIComponent('%3Clink rel="stylesheet" href="../Content/kendo.office365.min.css" %3C/%3E'));

  // fallback to local Kendo UI scripts
  document.write(decodeURIComponent('%3Cscript src="../Scripts/kendo.all.min.js" %3E%3C/script%3E'));
  // also add kendo.aspnetmvc.min.js or kendo.timezones.min.js, if needed
}
Here, we attempt to qualify the kendo type in the global scope and if we're successful then we know that the CDN-based resources failed to load. In this case, we inject the stylesheets and the scripts in the DOM since both resources have failed to load from the same location.
Once everything is setup and ready to go, we can move on to the not-so-simple part; configuring the datasource to work with the SharePoint REST API. As you'll see, the datasource must be properly configured in order to work with these endpoints, since they support a wide variety of serialization formats.
Configuring the DataSource to Access the SharePoint REST API
Once the resources for Kendo UI have been installed and set for the SharePoint Add-in, the next step is to configure a DataSource component to work with data from the SharePoint site. This includes data stored in document libraries, lists metadata, or user profiles. SharePoint exposes a number of service interfaces that can be consumed by the DataSource to perform CRUD operations.
For a full overview of the Kendo UI DataSource component, please refer to the documentation.
For the purposes of this article, I'll be focusing on configuring the DataSource for a SharePoint-hosted SharePoint Add-in. In this instance, a security context is assumed after a user has been authenticated by SharePoint. For scenarios outside this scope, the configuration will look the same. However, authentication would occur as a separate step with a security token provided and used in the configuration of the DataSource.
Services that are exposed by SharePoint are RESTful and secured against unauthorized access. Therefore, it is important to configure the DataSource correctly in order to successfully perform CRUD operations against them. The best way to do this through the transport:
var dataSource = new kendo.data.DataSource({
  // other configuration properties omitted for brevity
  schema: {
    model: { /* ... */ },
    data: function (data) {
      return data.d && data.d.results ? data.d.results : [data.d];
    }
  },
  transport: {
    parameterMap: function (data, type) {
        if (type != "read") {
            return kendo.stringify({
              // emit object properties to the server
              Id: type != "create" ? data.Id : undefined,
              __metadata: type == "create" ? { type: GetItemTypeForListName("Calgary") } : undefined
            });
        }
        return kendo.data.transports["odata"].parameterMap.apply(this, arguments);
    },
    read: {
      url: "<server>/<site>/_api/<feature_area>/<resource>",
      headers: {
        "accept": "application/json; odata=verbose"
      }
    },
    create: {
      headers: {
        "X-RequestDigest": $("#__REQUESTDIGEST").val(),
        "accept": "application/json; odata=verbose"
      },
      type: "POST",
      url: "<server>/<site>/_api/<feature_area>/<resource>"
    },
    update: {
      headers: {
        "accept": "application/json; odata=verbose",
        "X-RequestDigest": $("#__REQUESTDIGEST").val(),
        "X-HTTP-Method": "MERGE",
        "If-Match": "*"
      },
      type: "POST",
      url: function (model) {
        return "<url_of_item_being_updated>";
      }
    },
    destroy: {
      headers: {
        "accept": "application/json; odata=verbose",
        "X-RequestDigest": $("#__REQUESTDIGEST").val(),
        "X-Http-Method": "DELETE",
        "If-Match": "*"
      },
      type: "POST",
      url: function (model) {
        return "<string_to_item_being_deleted>";
      }
    }
  }
});
Let's take a look at what's happening here in detail.
It's important to emphasize the importance of defining a model for your DataSource since it drives the serialization plumbing. Most problems customers have when working with the DataSource stem from the fact that they neglect to define one.
Since SharePoint uses Atom as the default response format for its services, the DataSource must also be configured to include the Accept request-header with the JSON MIME-type specified (i.e. "accept": "application/json"). This will inform the recieving endpoint to issue a reply via JSON. When integrating with the SharePoint REST API, it's also important to define a data() function with the following boilerplate:
function (data) {
  return data.d && data.d.results ? data.d.results : [data.d];
}
This function is necessary in order to parse the payload that's returned by the SharePoint REST API due to the presence of the odata=verbose request-header. This header is used to receive responses in the Verbose JSON format. You can omit this value if you wish as JSON Light is now supported for the SharePoint REST API. However, doing so would require you to modify the boilerplate (above) to account for this change.
CRUD
Now let's move on to the CRUD operations. We'll start with how we load data into the DataSource via the read operation:
read: {
  url: "<server>/<site>/_api/<feature_area>/<resource>",
  headers: {
    "accept": "application/json; odata=verbose"
  }
}
This configuration is relatively simple. Yet, the URL itself can be a source of some confusion. Services are exposed by SharePoint through the URI structure, <server>/<site>/_api/<feature_area>/<resource>. The general guidelines for determining the endpoint URIs for these services are available on MSDN. The DataSource must be configured through the URL property of the read operation in order to load it with data from the service endpoint.
A Brief Word on Permissions
SharePoint exposes objects like lists and documents through its REST APIs. These objects are protected by permissions. Managing permissions tends to be the most common problem I see developers encounter when integrating the Kendo UI DataSource with SharePoint REST APIs. It's important to remember, with SharePoint add-ins, the DataSource assumes an authenticated security context. That stated, if you are integrating the Kendo UI DataSource on a remote page (i.e. a page that's not hosted on SharePoint) then you will need to authenticate against SharePoint via Microsoft Azure to secure a token.
Let's move on to the create operation:
create: {
  headers: {
    "X-RequestDigest": $("#__REQUESTDIGEST").val(),
    "accept": "application/json; odata=verbose"
  },
  type: "POST",
  url: "<server>/<site>/_api/<feature_area>/<resource>"
}
As mentioned previously (above), the SharePoint REST API are exposed through a URI structure and the DataSource is configured to target the endpoint that maps to create operations. Since these services are RESTful, the DataSource must use the POST request method for create operations. A X-RequestDigest request-header must also be defined through configuration to ensure it is provided to the receiving service. This represents the Request Digest token that's issued by SharePoint when a user has been authenticated. It's available as hidden input field in the page and it's value is accessed through a selector.
Finally, the update and destory methods are configured in a similar fashion:
update: {
  headers: {
    "X-RequestDigest": $("#__REQUESTDIGEST").val(),
    "X-HTTP-Method": "MERGE",
    "If-Match": "*"
  },
  type: "POST",
  url: function (model) {
    return "<string_to_item_being_updated>";
  }
},
destroy: {
  headers: {
    "X-RequestDigest": $("#__REQUESTDIGEST").val(),
    "X-Http-Method": "DELETE",
    "If-Match": "*"
  },
  type: "POST",
  url: function (model) {
    return "<string_to_item_being_deleted>";
  }
}
In both cases, these operations target service endpoints that reference individual resources. This is represented by a URI string that's generated dynamically through the inline function defined for the URL property. For example:
url: function (model) {
  return origin + leavesUrl + "(" + model.Id + ")"
}
Additionally, the update and destroy operations target service endpoints through the MERGE and DELETE request methods respectively. Again, this meets the criteria necessary for interacting with RESTful service endpoints. The If-Match request-header is used for the update and destroy operations in order to ensure optimistic locking of the resource that's referenced by its ETag or entity tag. By specifying a wildcard (i.e. "*"), you are opting to have any changes that are conducted elsewhere to be overriden. The alternative is to specify the value that was returned by the REST API for the original read operation.
Creating the User Interface with Kendo UI
Once the DataSource has been configured to access data from the SharePoint REST API, the next step is to integrate it with Kendo UI components. We have published a repo on GitHub, kendo-ui-sharepoint-2013-demo that provides an example of what a SharePoint Add-in might look like with the Chart, DropDownList, and Scheduler components from Kendo UI:
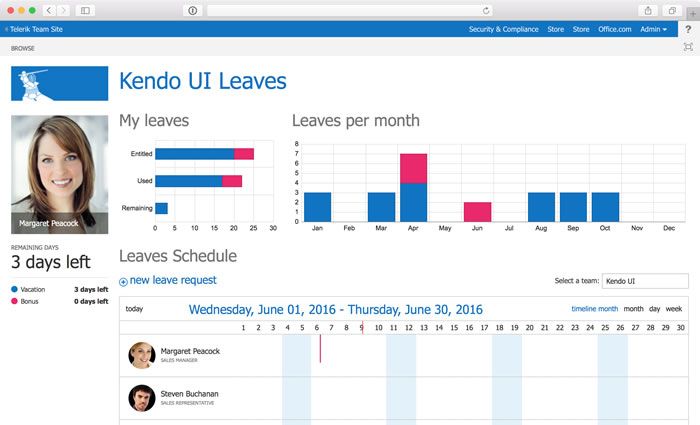
Both charts visualize data from a SharePoint list loaded by an underlying DataSource through the SharePoint REST API. The markup for these components is simple:
<div class="left-col">
  <h1>My leaves</h1>
  <div id="chart-totals"></div>
</div>
<div class="right-col">
  <h1>Leaves per month</h1>
  <div id="chart"></div>
</div>
These charts are bound to data loaded by a DataSource component with the following configuration:
$("#chart").kendoChart({
  dataSource: {
    // ...
    transport: {
      read: {
        url: "<server>/<site>/_api/<feature_area>/<resource>",
        headers: {
          "accept": "application/json; odata=verbose"
        }
      }
    }
    // ...
  }
});
The Scheduler and DropDownList components on the page are also underpinned by DataSource components that are setup in a manner similar to the configuration boilerplate provided above.
Deploying Your SharePoint Add-in
Visual Studio simplifies the process of deployment for your SharePoint Add-in. This is accomplished by building a deployment package (i.e. sharepoint-addin.app), which contains the add-in manifest (appmanifest.xml), SharePoint solution packages, add-in parts, localization resource files, and other associated files.
The add-in manifest is particularly important since it defines the properties of your deployment package:
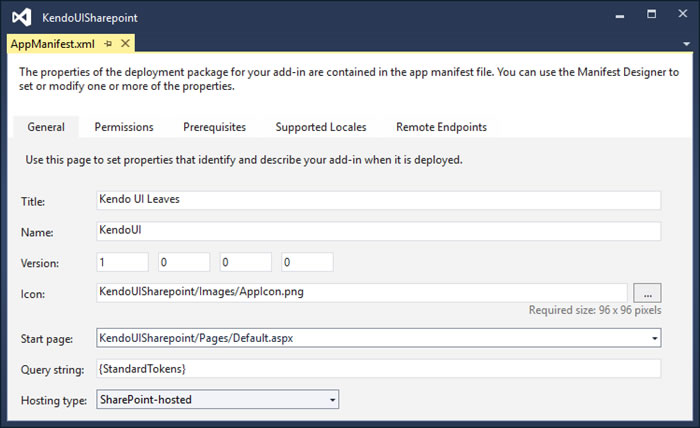
In particular, it's important to define the app permissions the SharePoint Add-in requires in order to run:
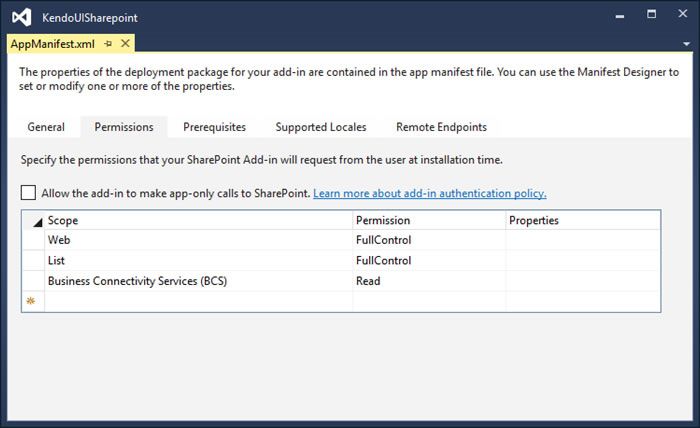
Without these permissions, many operations conducted against SharePoint - like targeting the SharePoint REST APIs - will fail.
Once your deployment package is built, it can be deployed to a remote SharePoint instance. This is automated through Visual Studio if it's already connected to SharePoint. This is the final step in the process, where a site administrator must permit or deny the permissions requested. This is an all-or-nothing process - a SharePoint Add-in will not be installed unless all permissions that are requested are granted to it:

For more information about deployment packages, I'd encourage you to read the article, Explore the app manifest structure and the package of a SharePoint Add-in on MSDN.
Wrapping Up
As I stated earlier, we have published a repo on GitHub, kendo-ui-sharepoint-2013-demo that provides an example of what a SharePoint Add-in might look like with the Chart, DropDownList, and Scheduler components from Kendo UI integrated with backend data from SharePoint REST APIs.
Finally, it's good to know that, if you're looking to build applications that target Office 365, last year, Microsoft selected Kendo UI as the preferred UI toolset for building Office 365 and SharePoint apps.
Related Resources

John Bristowe
John Bristowe is a member of the Developer Relations team at Progress. He specialises in web and mobile app development.
Comments
All articles
Topics
Latest Stories
in Your Inbox
Subscribe to be the first to get our expert-written articles and tutorials for developers!
All fields are required