
Build and Deploy Your ASP.NET Core Application with Apache

ASP.NET Core is the latest web framework from Microsoft that supports development with C# and the .NET Framework. In this latest incarnation of ASP.NET, you can choose to use an alternative .NET framework called .NET Core in order to deliver on some amazing new promises from the Microsoft team. By using the .NET Core framework with ASP.NET Core, you can develop and publish your applications on non-Windows platforms like MacOS or Linux. In this article, we're going to review the steps you need to know in order to build and deploy to a Linux server running Apache.
Why ASP.NET Core
Microsoft has made a lot of noise about their new web framework and its improved capabilities. Why should we consider building applications with a framework that has so much baggage behind it and try it on Linux, somewhere they have traditionally shunned?
- Don't let the name fool you, this is a brand new web framework from Microsoft. It has been re-written from the ground up based on the lessons they learned from its older sibling, ASP.NET 4.6.
- The ASP.NET team took some steps away from Microsoft's traditional methods and made this in a way that focused on the community first, and delivered enterprise grade features along the way. ASP.NET Core is completely open-source, with code available on GitHub.
- The project has been focused on performance, and particularly focused on the standard TechEmpower Benchmarks. In the first benchmark released with ASP.NET Core on Linux appearing, it scored in the top 10 with a whopping 1.8 million requests per second.
- You can now build your application with any text editor, Visual Studio Code, Visual Studio 2015/2017, or even the new Visual Studio for Mac and deploy it to any environment with support for containers, Windows and Linux production environments.
To learn more about the new features in ASP.NET Core, check out the ASP.NET Core Changes Every Developer Should Know whitepaper, which includes code snippets to get you started.
In this article, I am going to work on my application with Visual Studio 2017 RC and deploy it to a VM running Ubuntu Linux with Apache 2.
// "Build and Deploy Your ASP.NET Core Application with Apache" is one of our top 5 .NET articles of 2017. See the full list here.
The Demo Application
I wanted to build a simple demo application that could be run on any operating system and show me some data in an interesting way. For this demo, I wrote a simple map application that shows the map of the United States, color-coded for the presidential candidates who won each state, across historical elections using election result data from Wikipedia.
I started with a basic ASP.NET Core application without security configured, and removed everything that wasn't the front page of the application. Next, the Telerik ASP.NET Core UI controls were added to my project so that I could generate a map in the middle of the page. This was easy to do, by adding a NuGet source to my project for the Telerik NuGet repository and then adding the controls package from the NuGet Package explorer.
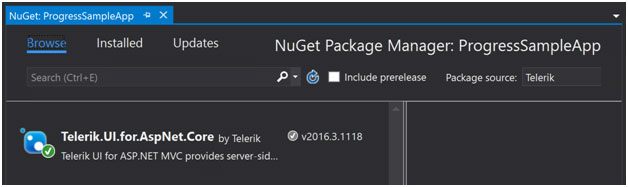 Figure 1 - Installing the Telerik UI for ASP.NET Core package
I added the Map control inside of the Views/Home/Index.cshtml razor page with the following syntax: @(Html.Kendo().Map()
@(Html.Kendo().Map()
        .Name("Presidential_Map")
        .Center(30.2681, -97.7448)
        .Zoom(3)
        .Layers(
          layers =>
          {
            layers.Add()
              .Style(style => style.Fill(fill => fill.Opacity(0.7)))
              .Type(MapLayerType.Shape)
              .DataSource(dataSource => dataSource
                .GeoJson()
                .Read(read => read.Url(Url.Content("~/js/UsStates.json")))
              );
          })
         .Events(events => events
            .ShapeCreated("onShapeCreated")
            .ShapeMouseEnter("onShapeEnter")
            .ShapeMouseLeave("onShapeLeave")))
I used the UsStates.json file that comes with the map control to give an outline of the country and states for highlighting on a layer within the map. The events at the end of the configuration allow me to paint the states correctly as red or blue depending on who was elected from each state. The onShapeEnter and onShapeLeave events will allow me to build a simple pop-up tooltip that shows details about each state.
To make this an interactive exploration of presidential results, I added a simple FORM to allow choosing an election year to review those results:
<form method="post" action="/">
    <label for="yearSelector">Change year:</label>
    <select name="year" asp-for="@selectedYear" asp-items="@years"></select>
    <kendo-button type="submit" name="submit">Submit</kendo-button>
</form>
There are some interesting things in this markup that we need to review. First, the select element has an asp-for attribute and an asp-items attribute. These items are part of the features of the default ASP.NET Core Tag Helpers. For the select element, these attributes will trigger a server-side operation to iterate over the items in the years variable and mark the item with the same value as the selectedYear variable as selected within the HTML select element. The years variable is declared as an IEnumerable<SelectListItem> collection. The select tag helper uses this type to build out the items housed in the rendered control.
The next item to look at in this collection is the kendo-button element. That's not a typical HTML element, but rather is a tag helper that will automatically build out a button element with the appropriate Kendo theme and styles applied. We need to inform ASP.NET that we want to use these tag helpers by adding to our razor page an addTagHelper directive. You can place this directly in the cshtml file you are working in, or you can place it in the _ViewImports.cshtml file if you would like it to be applied to all views. The syntax for this tag helper in my _ViewImports.cshtml along with the default Microsoft tag helpers is as follows:
@using Kendo.Mvc.UI
@addTagHelper *, Microsoft.AspNetCore.Mvc.TagHelpers
@addTagHelper *, Kendo.Mvc
More configuration options about the kendo-button and other tag helpers from Telerik are available in the documentation.
With a little bit of JavaScript and a simple WebAPI to format and present the data for each election year, I was able to generate a nice web page that would allow me to explore the results of the elections:
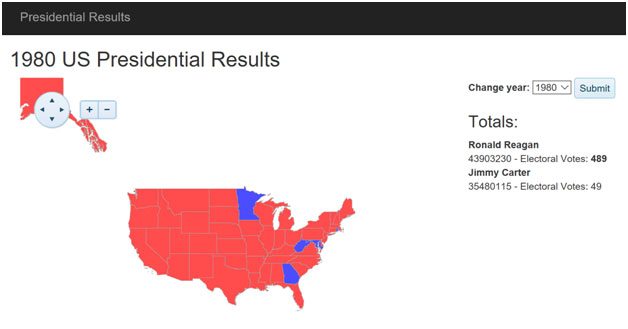 Figure 2 - Simple Web Application showing the results of the election
Package and Deploy as a Self-Contained Application
With Visual Studio 2017, we can package our web application with all of the references needed to run on Linux by building a "Self-Contained Application". This type of deployment does not require a .NET SDK to be installed on a server, and can be deployed to any machine that does not have any .NET features installed. For this application, we are going to deploy it to a fresh Ubuntu 16.04 server running in a virtual machine. In order to build the application as a self-contained deployable unit for Ubuntu with Visual Studio and the new csproj file format, we need to make a small change to the content of the csproj file to instruct the .NET build process which runtime to target. This is accomplished by adding a RuntimeIdentifiers element to a PropertyGroup with the list of possible runtimes that our application can target. For this sample, I have updated my csproj to have an initial PropertyGroup element that matches the following:
<PropertyGroup>
    <OutputType>Exe</OutputType>
    <TargetFramework>netcoreapp1.1</TargetFramework>
    <PreserveCompilationContext>true</PreserveCompilationContext>
    <RuntimeIdentifiers>win7-x64;win7-x86;ubuntu.16.04-x64;</RuntimeIdentifiers>
    <SuppressDockerTargets>True</SuppressDockerTargets>
</PropertyGroup>
The RuntimeIdentifiers element lists the Runtime IDs (RIDS) that this application can support, and are separated by semicolons (;). A complete list of available runtime identifiers is available on docs.microsoft.com
We can then build the application for the Ubuntu 16.04 runtime in Release configuration by executing the following command at the command-line:
dotnet publish -c Release -r ubuntu.16.04-x64The –c switch specifies the build configuration name and the -r switch specifies the name of the runtime to bundle platform specific binaries for. If we do not specify these switches, the dotnet command will build in Debug configuration and publish the contents of the application assuming that a .NET SDK is installed. With our output now available in the bin/release/netcoreapp1.1/ubuntu.16.04-x64/publish folder, we can copy that to our Linux VM with the following command from the publish folder:
scp -r \* jeff@192.168.1.241~/MyAppThis places all of the files needed to run our application in the /home/Jeff/MyApp folder. We will need to grant execution privileges on the application, by executing the following command:
chmod +x MyAppNotice that on Linux and Mac environments, the startup application generated for our project is the name of the project without an extension. On Windows, this application would be named MyApp.exe
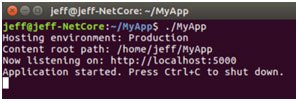
We should be able to run our application now with the following command:
./MyAppYou should then see the following output to indicate that the web application is running properly:
Let's not leave our application in a home folder, and let's copy it out to /var/MyApp
cp -r ~/MyApp /varFinally, let's create a startup script that ensures our application is running from the correct folder. Place the following content into /var/MyApp/StartMyApp
#!/bin/sh
cd /var/MyApp
./MyApp
Configure Apache
The next step is to configure Apache to run as a reverse-proxy in front of the application. First, you will want to ensure that you have the latest version of Apache installed and ready to go. Update your apt configuration and install the latest version of Apache with the following commands:
sudo apt-get update -y
sudo apt-get install httpd
Next, we will need to instruct Apache to enable the proxy module with the following command:
a2enmod proxyWe can then write a configuration file for Apache to host our application in /etc/apache2 folder called myapp.conf with the following content:
<VirtualHost *:80>
  ProxyPreserveHost On
  ProxyPass / http://127.0.0.1:5000
  ProxyPassReverse / http://127.0.0.1:5000/
  ErrorLog /var/log/apache2/myapp.log
  CustomLog /var/log/apache2/myapp.log common
</VirtualHost>
This configuration creates a virtual host that listens to any request coming on port 80 and pass all requests received starting at the root folder location to the service listening on the local machine on port 5000 (the default for ASP.NET Core). The proxy is configured for bi-directional communication, so that replies from port 5000 are returned to the requestor. Finally, some log locations are configured.
We can then restart Apache with the new configuration installed using this command:
sudo systemctl restart apache2Configure our ASP.NET Core application to run as a service
Apache will start with our server and be configured to hand off requests to ASP.NET Core, and we will need our ASP.NET Core application to start as service and operate in concert with the Apache server. To configure this, we need to add a service definition file to our system. Start by creating a service definition file in the /etc/system/system folder named myapp.service and place the following contents in it:
[Unit]
    Description:  My ASP.NET Core Application

    [Service]
    ExecStart=/var/MyApp/StartMyApp
    Restart=always
    RestartSec=10
    SyslogIdentifier=myapp
    User=apache
    Environment=ASPNETCORE_ENVIRONMENT=Production

    [Install]
    WantedBy=multi-user.target
This configuration will instruct the apache user to start the StartMyApp script that we wrote earlier. If there is a problem, it will wait 10 seconds and attempt to restart the application. Finally, the information about this application will be written to the system log with the identifier "myapp".
We can enable the service by executing the following:
systemctl enable myapp.serviceWe can then start the service by executing:
systemctl start myapp.serviceYou should now be able to browse to http://localhost:5000 and see the output from the kestrel web server and ASP.NET Core. You can then browse to http://localhost and you should see the same content returned through the Apache proxy.
Summary
This is a very basic Apache configuration, and there are many other options that you may want to configure before hosting your application on the Internet. You should consider turning on SSL, Rate-limiting, MIME-Type sniffing, and load-balancing to allow multiple instances of the ASP.NET Core application running behind the Apache server. Additionally, you may want to configure a firewall in front of your Linux server to only allow ports 80 and 443 (if you configure SSL) through.
ASP.NET Core allows us to build our .NET web applications where we want and deploy to any service that we want. The Telerik controls for ASP.NET Core are built with .NET Core in mind and just work as expected on all of these target environments. Install the latest Visual Studio 2017 and grab a copy of the Telerik ASP.NET Core controls and start developing your application with the newfound freedom and performance of ASP.NET Core.
You can find a copy of the sample code in this application at: https://github.com/telerik/aspnet-core-cross-platform-demo
Related resources:

Jeffrey T. Fritz
Jeffrey T. Fritz is a Microsoft MVP in ASP.Net and an ASPInsider with more than a decade of experience writing and delivering large scale multi-tenant web applications. After building applications with ASP, ASP.NET and now ASP.NET MVC, he is crazy about building web sites for all sizes on any device. You can read more from Jeffrey on his personal blog or on Twitter at @csharpfritz.
Comments
All articles
Topics
Latest Stories
in Your Inbox
Subscribe to be the first to get our expert-written articles and tutorials for developers!
All fields are required