
Choose ES6 modules Today!

I am done using outdated and non-standard module solutions. I have been waiting a long time for ES6 modules and I want as much ES6 as I can get...today! I want all of this without having to choose, or without being forced to choose, one specific packaging registry over another. So, let me get straight to the point.
I believe when starting a new front-end development (i.e. a SPA or native browser application) project, you should stop doing the following.
- using Require.js or Browserify to load modules and manage dependencies.
- using one specific repository of packages alone (i.e. npm alone) tied to one specific non-ES6 module format (i.e. CommonJS alone).
Stop that and start:
- Using ES6 package control syntax (aka ES6 modules) and the module loader (i.e.
System.import) for importing, exporting, and loading modules. - Using jspm.io to load any type of third-party module (i.e. ES6, AMD, CommonJS, UMD, global) from any registry (i.e. npm, Bower, Github) by way of ES6 modules syntax and
Systemloader (polyfill provided by SystemJS & es6-module-loader)
You want to do this because building a standards-compliant and future-friendly application, while not tightly coupling yourself to AMD or CommonJS (and friends) and their respective package managers, just makes good, damn sense. Why? Because jspm.io and SystemJS favor ES6 module standards and they're agnostic when it comes to a specific, non-standard module format of the past or a specific repository of packages alone.
Use ECMAScript 6 Modules Today
By using jspm.io you can make use of the official JavaScript module control system (and its syntax) today - all while not having to wait for older modules to be re-written or having to limit yourself to one particular module format or package manager. In other words, you shouldn't have to care from where a package comes and in what format it's being provided.
The ideal, and yes we have arrived, is to just use ES6 modules and let a tool like jspm.io sort out all of the ugly details as it pertains to non-es6 modules from multiple endpoints. Not to mention, by using jspm (and a ES6 transpiler like traceur or Babel) you get most everything that ES6 offers, not just modules. Writing ES6 code in your ES6 modules sounds good, right!
In the remainder of this article I am going to show an example of using jspm.io in your architecture so that your development code (production gets compiled to ES5) uses ES6 module syntax to potentially load any type of module (e.g. ES6, AMD, CommonJS, UMD, and global modules) from anywhere (e.g. npm, Bower, and Github).
Getting Setup with Node.js, Browser-sync, and jspm
First things first, we have to set up a local Node.js development environment with some Node.js packages. To do this, follow the five steps below (Note: I've provided a video showing the steps that are detailed below and runnable code at Github. Watch the videos, read the steps, play with that code in that order):
Step 1. Install Node.js. Just go to https://nodejs.org/ and get an installer.
Step 2. Create a local folder named dropdown and a package.json file in that folder by running npm init. As the npm doc's describe, 'npm init' "will ask you a bunch of questions, and then write a package.json for you."
Step 3. npm install browser-sync --save-dev. We will need a server and something that alleviates wrist pain from clicking reload in a browser.
Step 4. Create an index.html in a src directory then write a browser-sync command that is stored as a script to be run by the npm CLI. One could Grunt or Gulp it up, but let's keep things simple. After all, most task running these days is done because one is too lazy (as it should be) to remember or type out tool specific terminal commands.
Step 5. npm install jspm/jspm-cli -g and npm install jspm --save-dev. This will install all the jspm packages needed to use jspm globally and locally (It is advisable to locally install jspm in additional to globally installing it to lock the version of jspm for a specific project).
Understanding the Stack
At this point, if you are following along, everything is set up for jspm development. But you might not exactly understand the stack you just set up. Let me break it down for you in more detail.
Node.js
Node.js is a JS platform for running JavaScript applications. You installed two NPM packages/applications, browser-sync and jspm, that will run locally to help you with development.
npm
npm is the Node.js package manager and is installed by default when you install Node.js from an installer. It is most helpful for developing Node.js applications. However, a lot of people attempt to use it, and desire it, to also be the package manager for the web/browser platform.
package.json
This file is created for you after running npm init and answer some questions. This JSON file holds all the metadata for a Node.js project and handles the details around the project's dependencies. Many of the npm CLI commands (e.g. npm install) use values defined in the package.json file. The npm run serveit is an example of a NPM command that uses a value found in the package.json file.
jspm
Think of jspm as a web/browser package manager, similar to Bower except jspm strives to sit over the top of all other package managers (including npm) and offers a module loader (i.e. SystemJS) that understands the installer. Its goal is to allow you to load any type of module from any registry. By using jspm, you are favoring a package manager that is not trying to play favorites. It is simply giving you the means to install any package from most any endpoint, while abstracting away module differences and repository endpoints, until which point everyone is using ES6 modules.
By default, jspm does offer official support for installing packages/modules from the npm registry and GitHub. Also, jspm offers its own small registry (a simple GitHub repo) that contains shortcut names used by the jspm CLI (e.g. jspm install jquery maps to jspm install github:components/jquery) to install package from npm and GitHub. Of course, any endpoint can be setup, npm and GitHub are just the defaults.
Additionally, by using jspm it is possible to pass overriding meta details for a package to the underlying SystemJS tool during installation. This is actually the most powerful part of jspm and I encourage you to think carefully about the power provide by jspm for overriding package.json configuration values during installation from the CLI or as part of the source of the package itself.
The value of jspm does not stop with the role of a package manager. By installing jspm you get SystemJS, a universal dynamic module loader and dependency manager built on top of the ES6 module loader polyfill all driven by Tracuer or Babel.
By using the jspm CLI to install packages, you are broadly accomplishing/abstracting the following processes.
- Installing a package/module from a registry, like npm, or some endpoint like GitHub.
- Configuring the config.js file used by SystemJS to load modules and bundle those modules for production
- Compiling ES6 to ES5
- Updating the package.json file with metadata used by jspm and SystemJS.
browser-sync
This Node.js application provides a web server, to server your app, and browser reloading when any of your local development files change.
Configuring jspm For Development
Hopefully, my summaries describing the stack have shed some light on jspm and its role in the stack. Next, I will show you how to configure jspm for development.
Step 1. Create a config.js by running $ jspm init. This will ask you a bunch of questions:
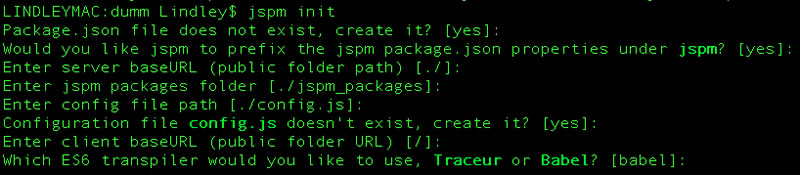
Based on the above questions and answers a config.js file will be added to the public folder (i.e. src).
Step 2. jspm install text css json SystemJS plugins. These three plugins let you use ES6 importing to bring CSS, JSON, and plain text strings into the scope of a module. Of course, the CSS plug-in doesn't really bring CSS into JS. Instead, it does what you might think, i.e. adds CSS to the HTML page the old fashion way by updating the HTML page with the correct <link href="">.
Step 3. Create a .jshintrc and startup.js file. I'm adding the .jshintrc file (i.e. {"esnext": true} ) so that JSHint will stop yelling at me about ES6 syntax. The startup.js file will be the first module that runs to start up our application.
{
  "esnext": true
}
Step 4. Include system.js, config.js in the index.html file using <script> elements and the startup.js file using System.import.
<!DOCTYPE html>
<html>
<head>
    <meta charset="utf-8">
    <meta http-equiv="X-UA-Compatible" content="IE=edge">
    <title></title>
    <script src="/jspm_packages/system.js"></script>
    <script src="/config.js"></script>
    <script>
        System.import('./startup'); //note no .js on this file
    </script>
</head>
<body></body>
</html>
Writing ES6 Modules Using JSPM
At this point we have everything set up and configured to write ES6 code and use ES6 modules. So let's take it for a spin by installing Kendo UI and Bootstrap and using them to create a simple DropDownList widget from a Kendo UI template and JSON data.
Step 1. 'jspm install kendo-ui bootstrap'. This will read the jspm registry and install kendo-ui and bootstrap from the paths stored in the jspm registry. Note that it will also install these packages using the kendo-ui and bootstrap overrides for GitHub.
Step 2. import the Bootstrap CSS and System.import the dropdown module into startup.js (Note my use of ES6 all over the place).
import 'bootstrap/css/bootstrap.css!';

System.import('dropdown/dropdown').then(
    dropdown => console.log(dropdown.dropdown.value()
));
Step 3. Create a dropdown folder and add a dropdownTemplate.html containing a Kendo UI template and a dropdownData.json file containing the data for the dropdown widget.
Template:
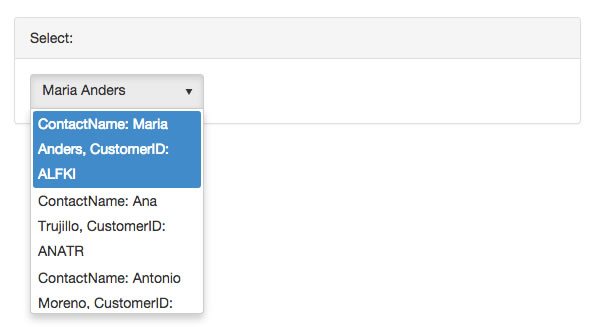
ContactName: #:data.ContactName#, CustomerID: #:data.CustomerID#Data:
{
    "CustomerID": "ALFKI",
    "ContactName": "Maria Anders",
    "CompanyName": "Alfreds Futterkiste"
}, {
    "CustomerID": "ANATR",
    "ContactName": "Ana Trujillo",
    "CompanyName": "Ana Trujillo Emparedados y helados"
}...]
Then code the dropdown.js module using ES6 syntax and SystemJS plugins to create a Kendo UI dropdown widget when dropdown.js is imported.
//JS
import kendo from 'kendo-ui/src/js/kendo.dropdownlist.js';
//template
import dropdownTemplate from './dropdownTemplate.html!text';
//data
import dropdownData from './dropdownData.json!';
//css
import 'kendo-ui/styles/kendo.common-bootstrap.min.css!';
import 'kendo-ui/styles/kendo.bootstrap.min.css!';

const view = $('<div class="panel panel-default" style="margin:50px"> <div class="panel-heading">Select:</div> <div class="panel-body"><select></select></div></div>').appendTo('body');

const dropdown = new kendo.ui.DropDownList(view.find('select'),{
    template: kendo.template(dropdownTemplate),
    dataTextField: 'ContactName',
    dataValueField: 'CustomerID',
    dataSource: dropdownData
});

export {dropdown};
Is this crazy awesome or what? ES6 modules today without leaving behind ES5 only browsers!
Bundling
But wait, you want more? Did I hear you say bundle? No problem. Let's do that too.
Using jspm, bundling will not only bundle all of your modules together into one build.js file (with a .map file), it will also inline all of your CSS imports into the HTML page. The command jspm bundle module1 + module2 --inject will update the config.js with bundle configurations. To un-bundle when using --inject you'll have to un-inject (i.e. remove bundle settings from config.js) the build files to go back to development mode. This is done by running, jspm unbundle.
Conclusion
I have laid the foundation for what I think should be the starting point for most any JavaScript web application project today. A lot of the details would still need to be defined and configured for a real solution, but the basic foundation has been discussed in this article - mainly, how to use ES6 modules while not hitching yourself to non-standard module solution or one repository of packages.
If you like what you have seen in this article, go get the code from GitHub and use it to learn or use it as a boilerplate to start your next JavaScript project using ES6 modules. At the very least, no matter how you do it make sure you are using ES6 modules moving forward (e.g. Angular 2 uses SystemJS & Aurelia uses jspm.io).
So, start using jspm.io today for ES6 modules, and grab the open source Kendo UI Core for a rockin' UI.

Cody Lindley
Cody Lindley is a front-end developer working as a developer advocate for Telerik focused on the Kendo UI tools. He lives in Boise, ID with his wife and three children. You can read more about Cody on his site or follow him on Twitter at @codylindley.
Comments
All articles
Topics
Latest Stories
in Your Inbox
Subscribe to be the first to get our expert-written articles and tutorials for developers!
All fields are required